23 Stylish Black and White Tile Bathroom
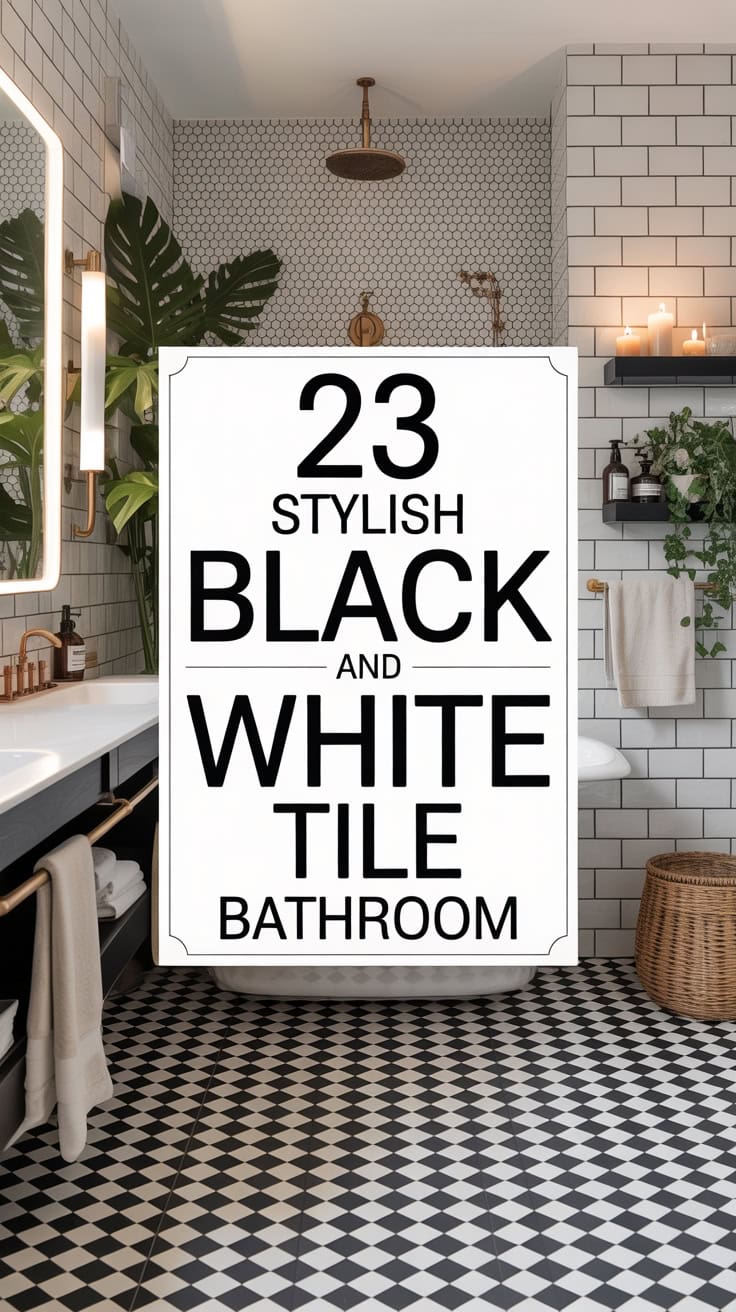
Ready to give your bathroom the ultimate chic makeover? You’re about to join the black-and-white tile club that’s been winning hearts since forever! These two colors are basically bathroom royalty because they never go out of style, hide water spots like ninjas, and make your space feel instantly luxe.
Plus, they play nice with literally every decor trend you’ll ever fall in love with!
Table of Contents
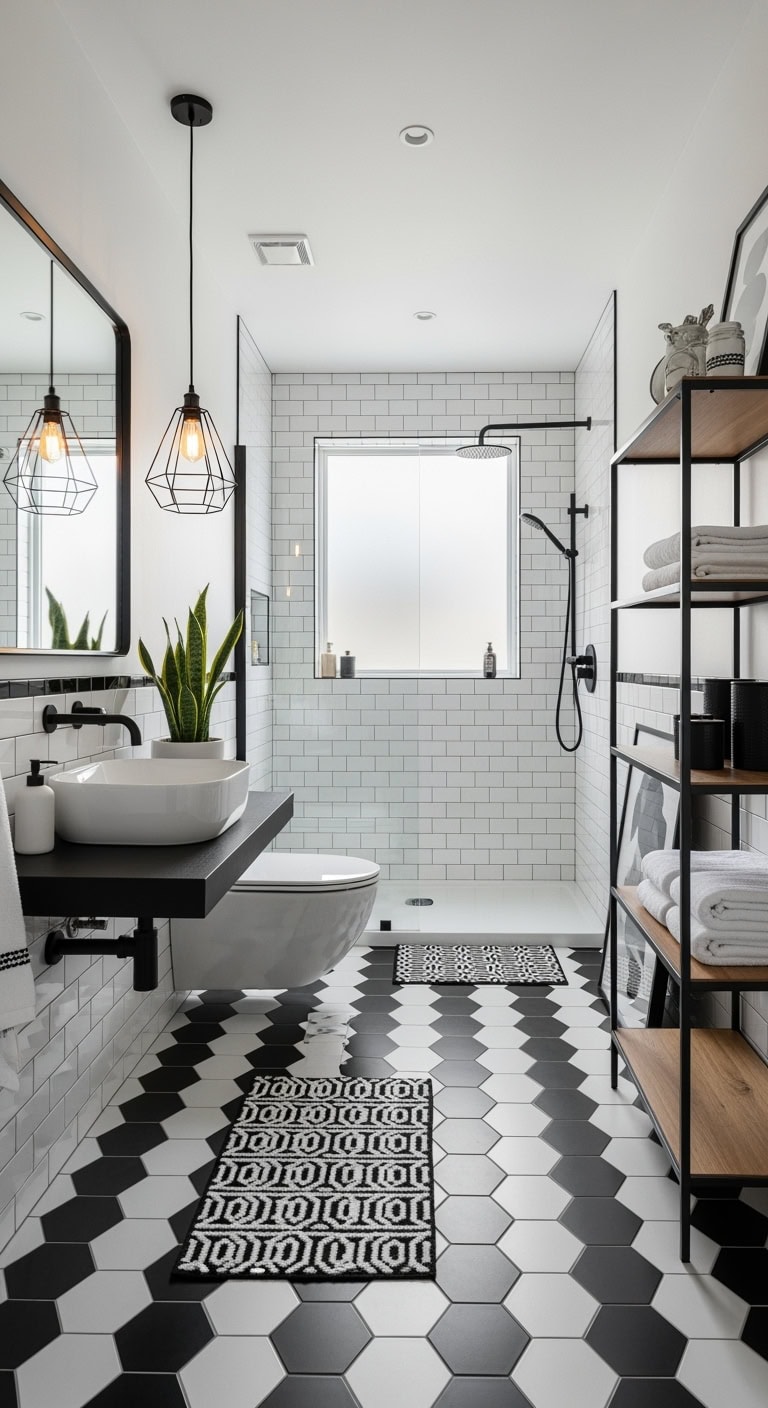
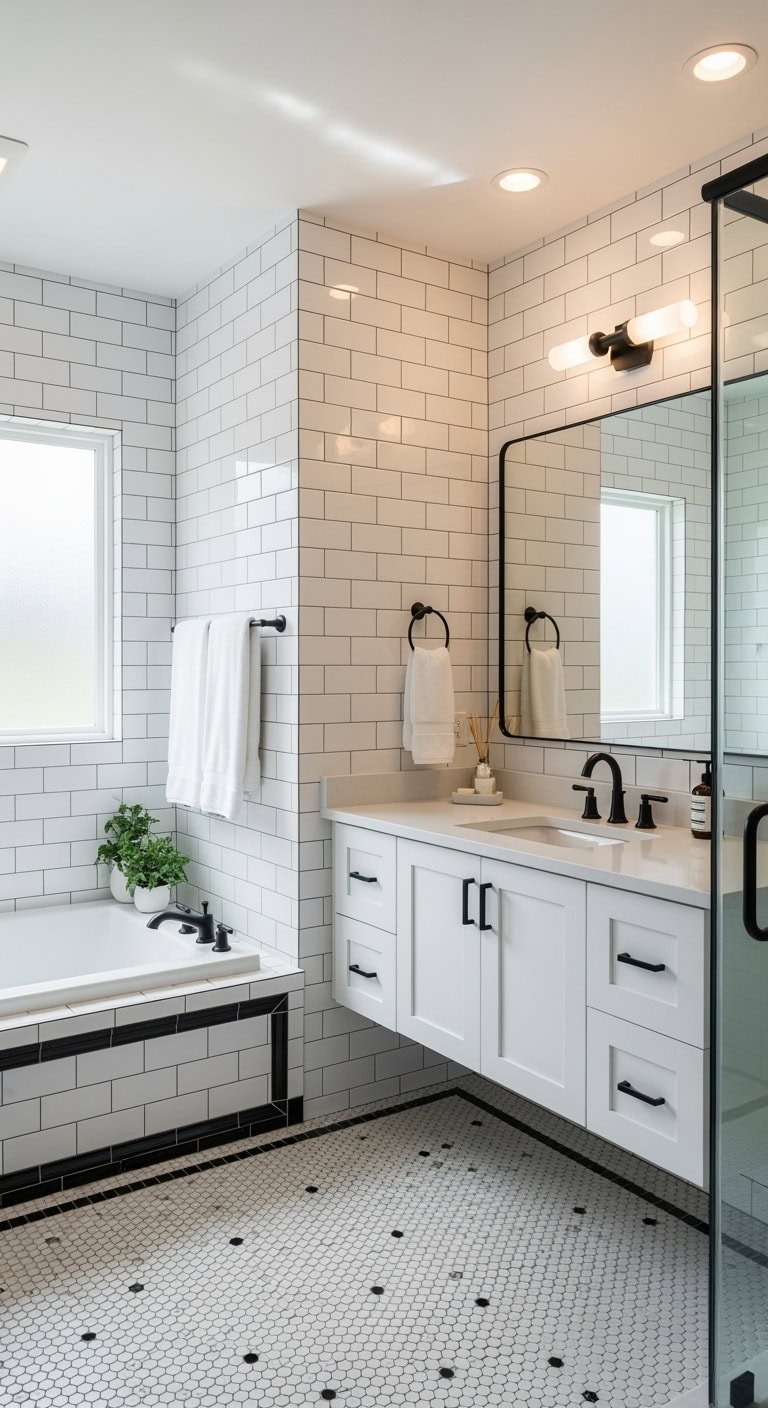
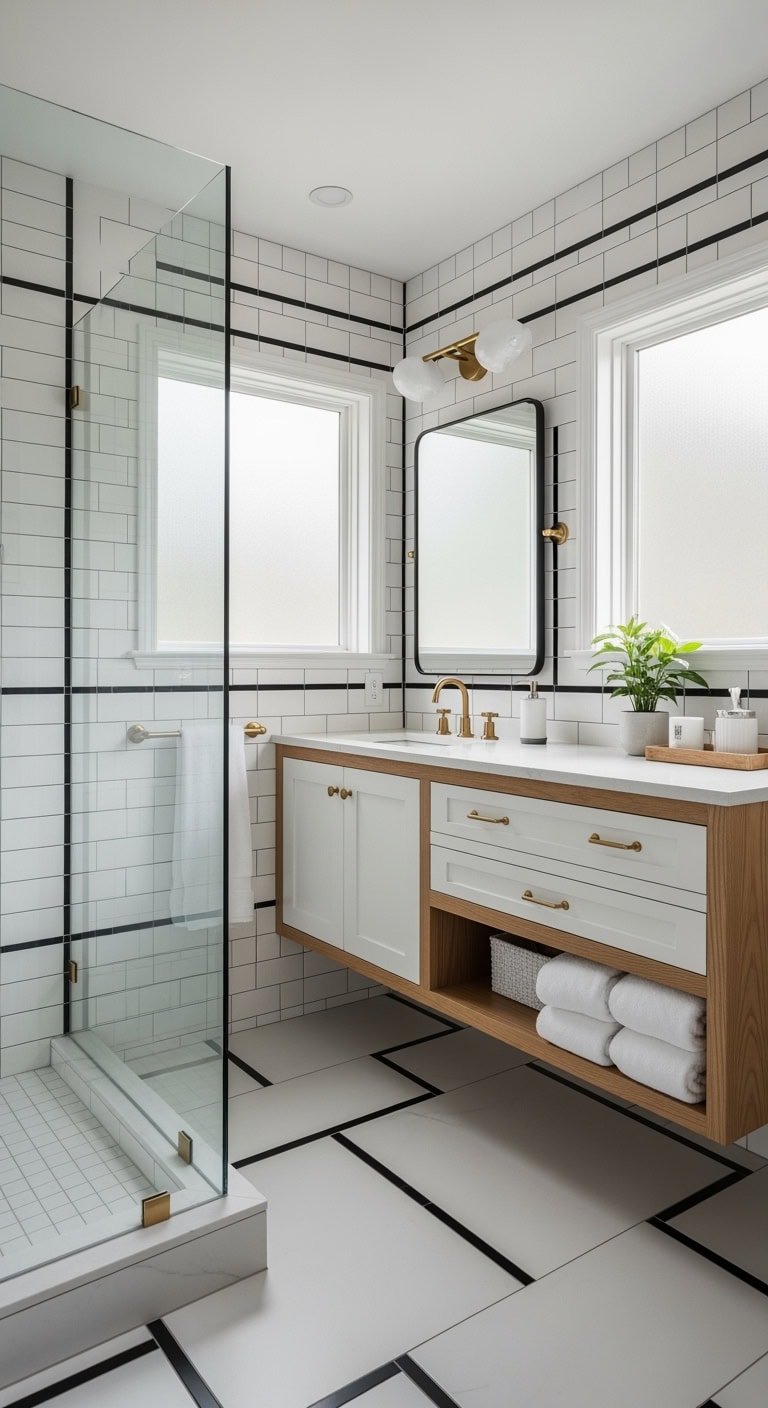
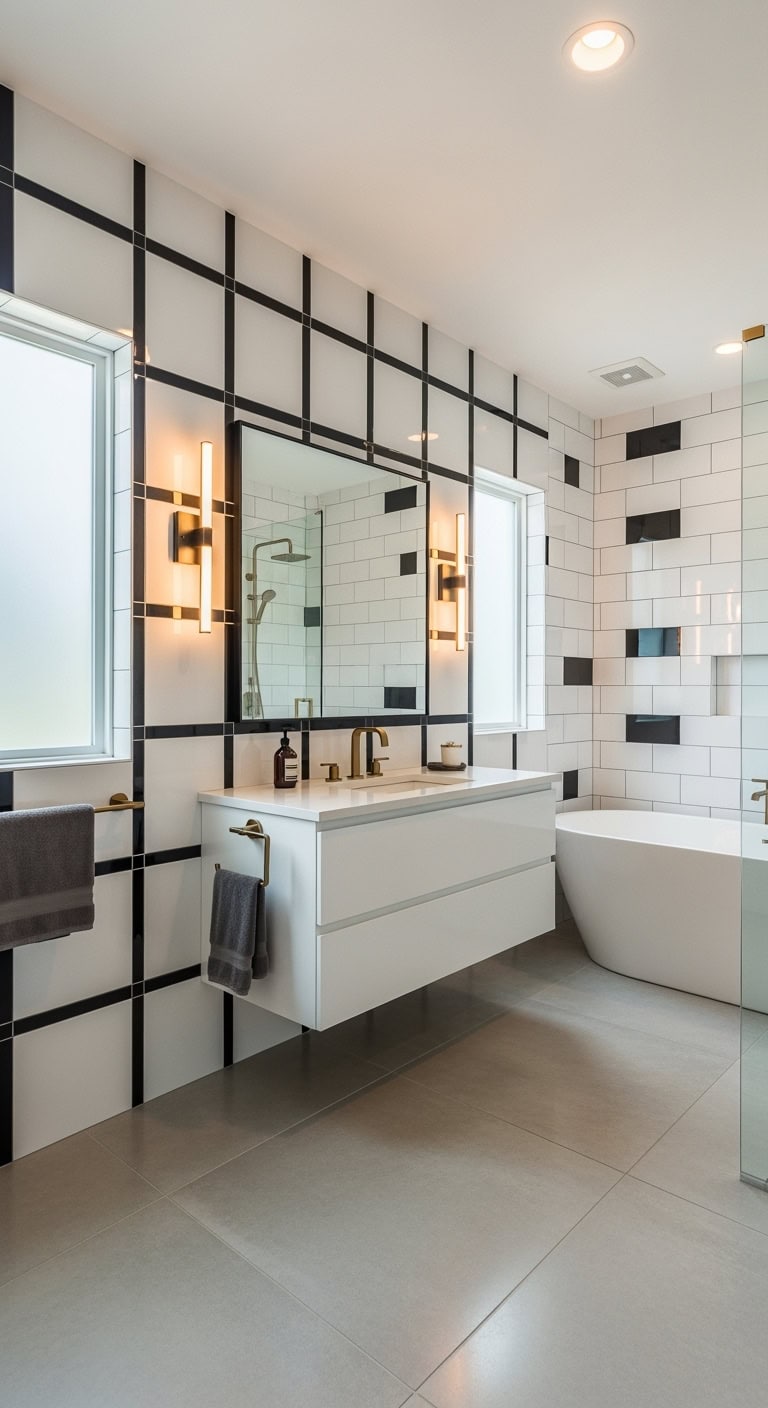
dern Minimalist: Sleek Subway Tiles With Contrasting Grout Lines
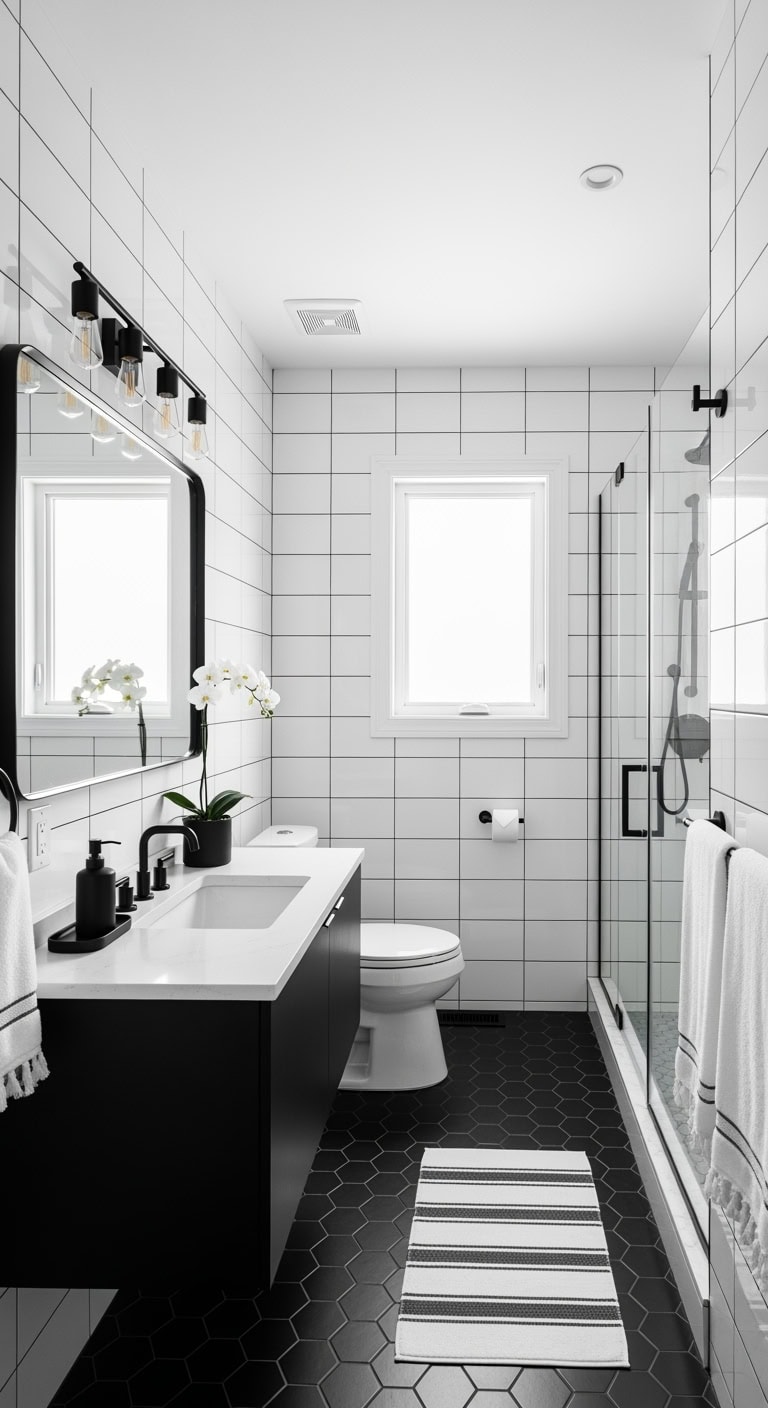
That coffee shop bathroom aesthetic where everything feels intentionally curated—crisp white subway tiles with bold black grout that frames each tile like your favorite grid-pattern Instagram feed. It’s giving downtown loft meets Scandinavian simplicity, the kind of look that makes getting ready feel like you’re in a boutique hotel.
Shop The Look:
- Matte black floating vanity with white quartz top
- Rectangular black-framed mirror (24″ x 36″)
- Linear black metal vanity light with exposed bulbs
- White wall-mounted medicine cabinet with black hardware
- Black and white striped cotton bath mat
- Pure white Turkish cotton towels (set of 6)
- White waffle-weave shower curtain with black edge trim
- Matte black soap dispenser and tumbler set
- Black hexagon drawer pulls and towel bars
DIY Paint Transformation
- Accent wall behind vanity: Benjamin Moore “Wrought Iron” (2124-10) creates that dramatic charcoal backdrop that makes white tiles and fixtures look magazine-worthy
- Main bathroom walls: Sherwin Williams “Pure White” (SW 7005) keeps the space bright and clean while letting your tile work be the star
- Trim and ceiling: Benjamin Moore “Super White” (OC-152) for that crisp architectural detail that elevates the whole minimalist vibe
Budget Range: $2,500-$5,000 | Timeline: 1-2 weeks | Best For: Powder rooms and guest bathrooms
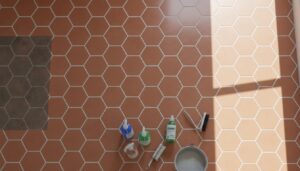
Farmhouse Chic: Hexagonal Floor Patterns With Shiplap Accents
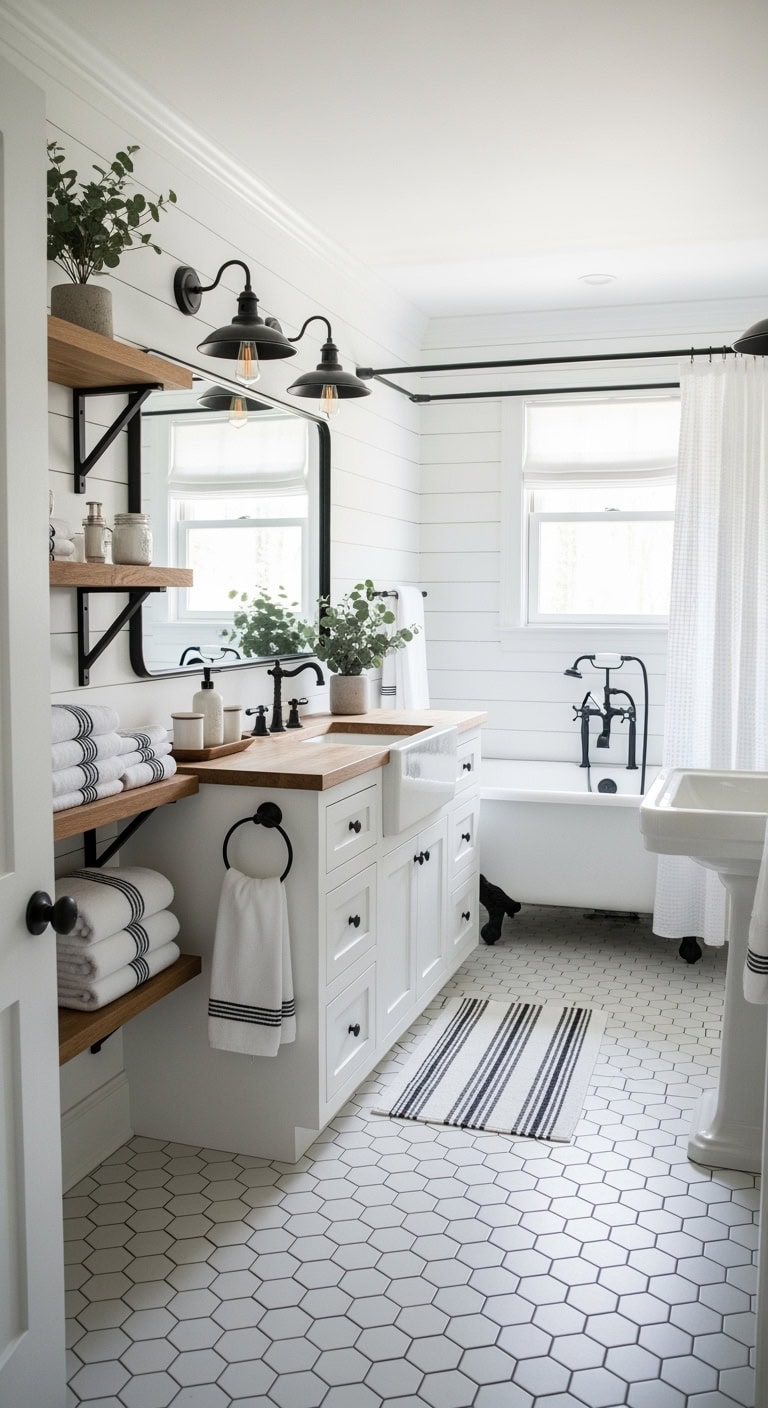
Picture your favorite farmhouse coffee shop bathroom but make it yours—that perfect mix of rustic charm and clean lines that feels both cozy and fresh. This style brings together classic hexagonal tiles with shiplap walls for that modern farmhouse look everyone’s pinning.
Shop The Look:
- White oak vanity with farmhouse sink basin
- Black-framed rectangular mirror with vintage details
- Industrial black pendant lights with Edison bulbs
- Open wooden shelving unit with metal brackets
- Black and white striped cotton bath mat
- White terry cloth towels with black trim detailing
- White waffle-weave shower curtain with black hooks
- Mason jar soap dispenser and toothbrush holder set
- Matte black faucet and cabinet pulls
DIY Paint Transformation
- Shiplap accent wall: Paint your DIY shiplap in Benjamin Moore “Simply White” OC-117 for that crisp, clean backdrop that makes black fixtures pop like your favorite filter.
- Main walls: Go with Sherwin Williams “Alabaster” SW 7008 on remaining walls—it’s the perfect warm white that complements both black tile and natural wood without looking yellow.
- Vanity makeover: Transform an old vanity with Benjamin Moore “Wrought Iron” 2124-10 for that dramatic contrast against white walls and hexagonal floors.
Budget Range: $2,500-$5,000 | Timeline: 2-3 weeks | Best For: Powder rooms and guest bathrooms
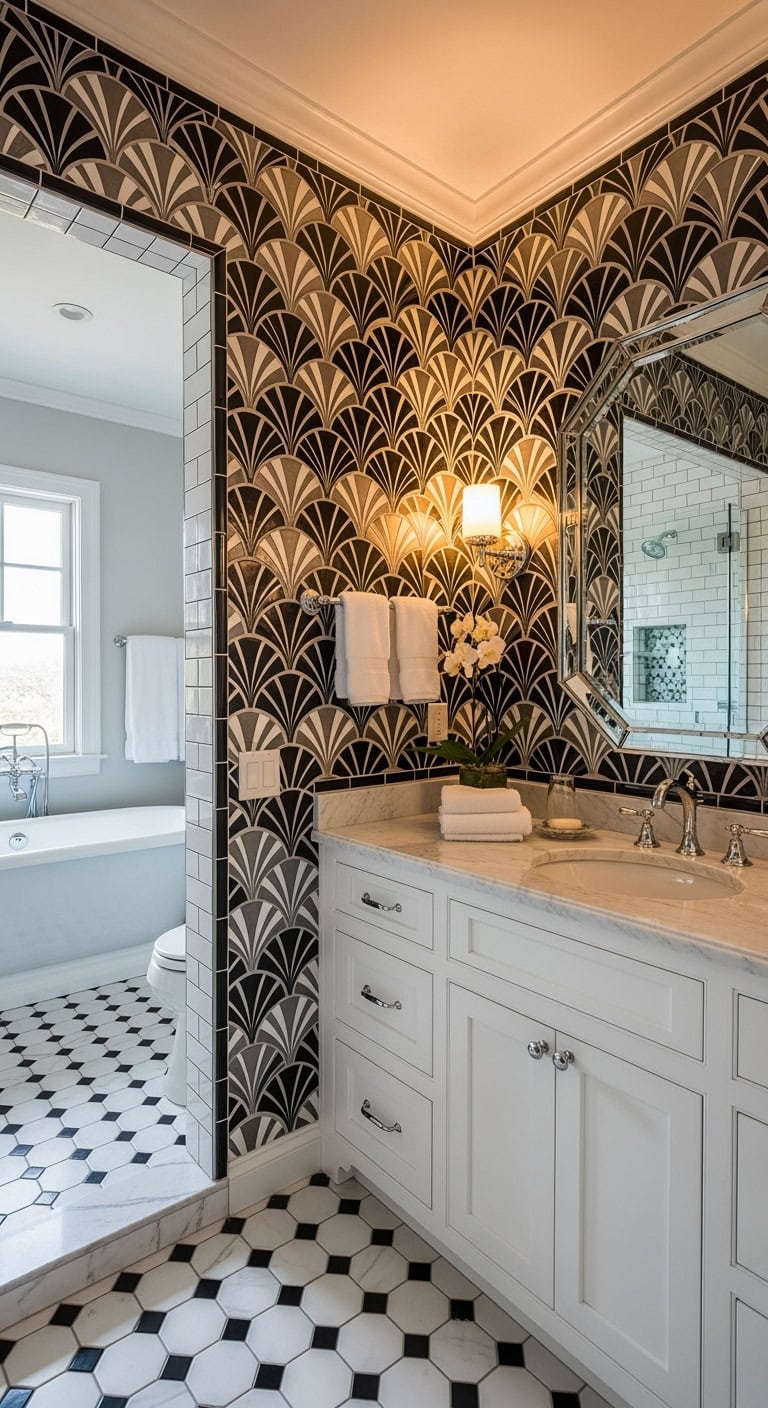
Art Deco Glamour: Geometric Diamond Tiles and Gold Fixtures
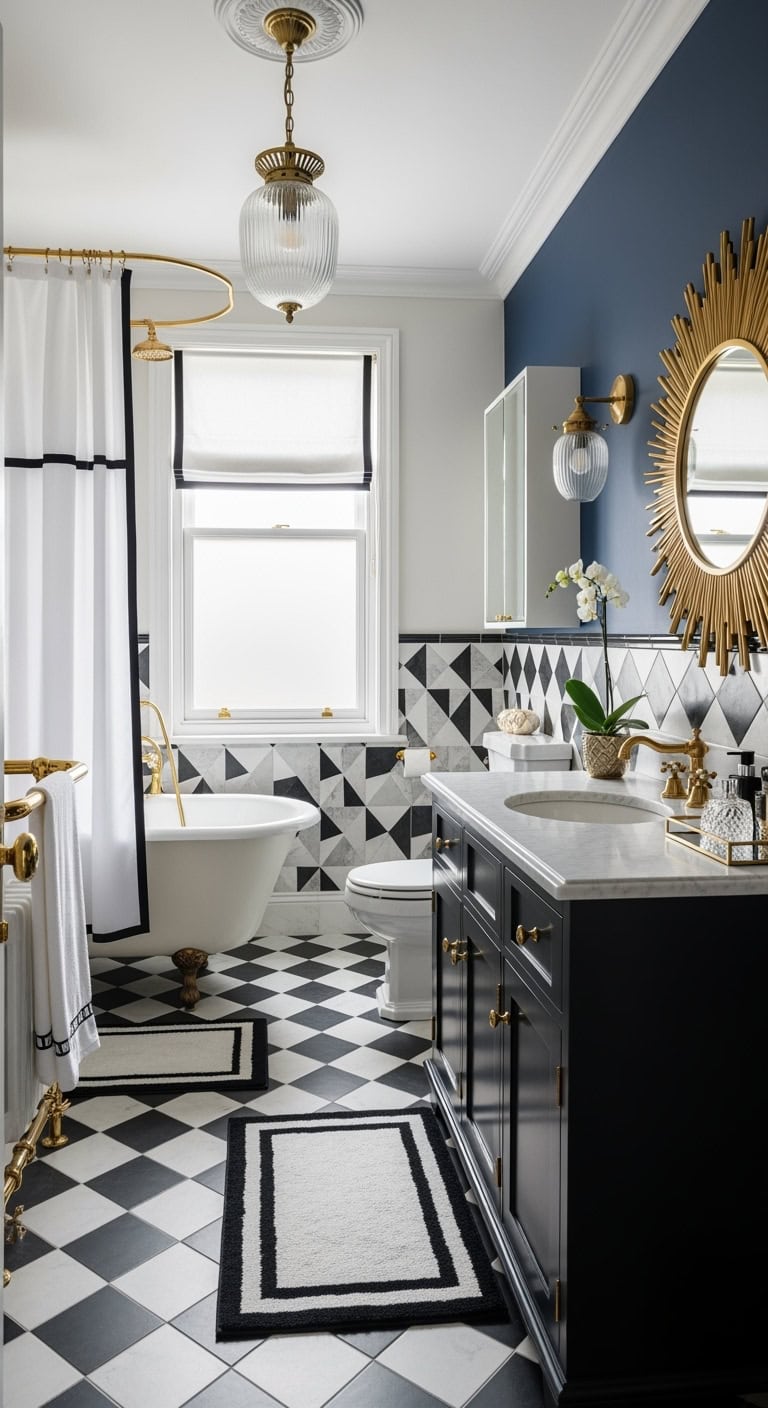
That Great Gatsby bathroom aesthetic you screenshot every time it pops up on your feed? Diamond tiles create instant luxury that makes getting ready feel like a scene from a classic movie. This is your powder room channeling 1920s glamour with modern function—like wearing vintage jewelry with your favorite blazer.
Shop The Look:
- Black lacquer vanity with brass legs and marble top
- Sunburst gold mirror with beveled edges (30-36″ diameter)
- Art Deco pendant light with frosted glass and gold detailing
- Mirrored medicine cabinet with gold trim
- Black and white geometric bath mat
- Plush white towels with gold embroidered borders (set of 6)
- White fabric shower curtain with black geometric trim
- Gold soap dispenser and tray set with marble accents
- Brass faucet set with cross handles
DIY Paint Transformation
- Accent wall sophistication: Benjamin Moore “Hale Navy” (HC-154) on one wall creates that moody speakeasy vibe that makes gold fixtures absolutely glow against the darkness.
- Main wall elegance: Sherwin Williams “Alabaster” (SW 7008) keeps three walls crisp and clean, letting your geometric tiles and fixtures take center stage.
- Ceiling drama: Benjamin Moore “Cloud White” (OC-130) overhead adds subtle warmth that prevents the space from feeling too stark while maintaining that classic contrast.
Budget Range: $4,500-$8,000 | Timeline: 2-3 weeks | Best For: Powder rooms and guest bathrooms
Scandinavian Simplicity: Large Format Tiles With Natural Wood Elements
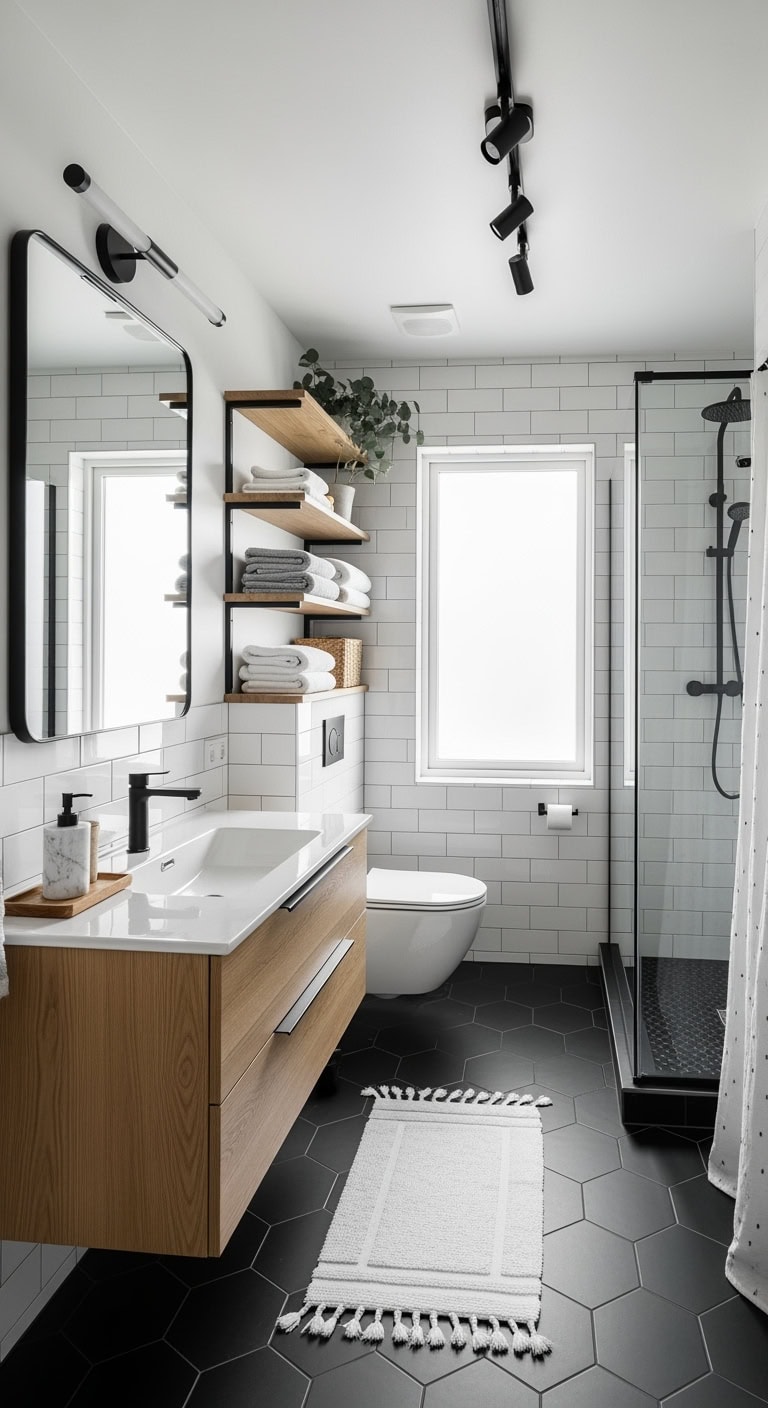
That minimalist aesthetic from your favorite coffee shop just met Nordic spa energy. Black and white tiles become the perfect canvas for blonde wood and cozy textures that make mornings feel intentional, not rushed. It’s giving “I vacation in Copenhagen” without the flight.
Shop The Look:
- Light oak floating vanity with clean-lined integrated sink
- Oversized rectangular mirror with thin black metal frame
- Matte black track lighting or minimalist pendant
- Open wooden shelving unit with black metal brackets
- Plush white Turkish cotton bath mat
- Pure linen towels in white and soft gray (set of 6)
- Simple white fabric shower curtain with subtle texture
- Marble soap dispenser and wooden tray set
- Matte black faucet and drawer pulls
DIY Paint Transformation
- Accent wall perfection: Benjamin Moore “Cloud White” OC-130 on the vanity wall creates that bright-but-not-harsh backdrop that makes wood tones sing like they do in West Elm catalogs.
- Surrounding walls: Sherwin Williams “Pure White” SW-7005 keeps things crisp without feeling sterile—it’s the white that influencers use for those perfectly lit selfies.
- Ceiling statement: Benjamin Moore “Super White” OC-152 on the ceiling bounces light around like those Scandinavian apartments you screenshot for inspiration.
Budget Range: $4,500-$7,500 | Timeline: 2-3 weeks | Best For: Master bathrooms needing a reset
Bohemian Elegance: Moroccan-Inspired Mosaic Tile Designs
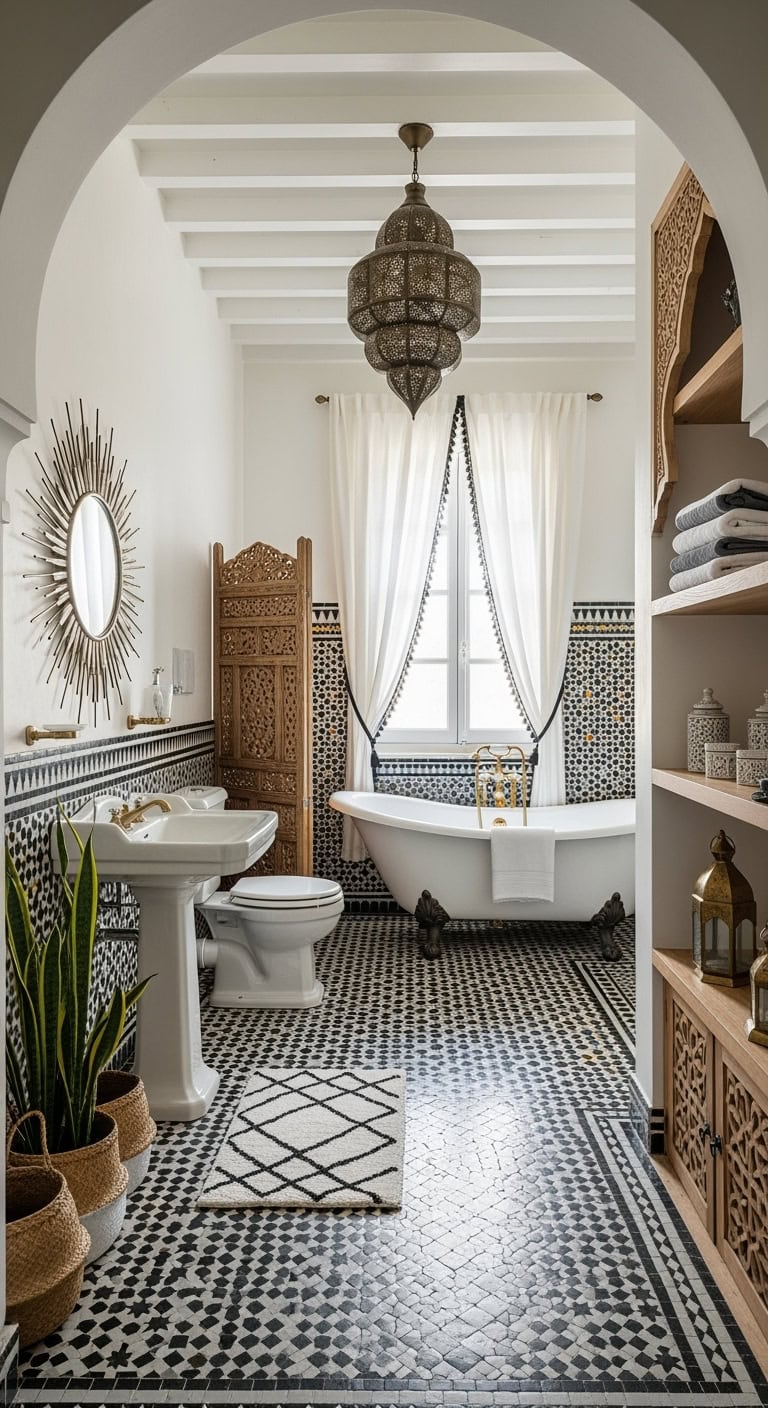
That Marrakech riad bathroom you screenshot every time it appears on your feed? The intricate patterns create the same vibe as your favorite boho coffee shop, where mismatched tiles somehow work perfectly together. This style transforms boring morning routines into mini escapes.
Shop The Look:
- White pedestal sink or console vanity with brass legs
- Arched or sunburst mirror with ornate metal frame
- Moroccan-style pendant light or lantern fixture
- Open wooden shelving unit with carved details
- Patterned black and white bath mat with geometric design
- Turkish cotton towels in black, white, and gray (set of 6)
- White shower curtain with black tassel or embroidered trim
- Ceramic or brass soap dispenser and tray set
- Antique brass or oil-rubbed bronze faucet upgrade
DIY Paint Transformation
- Accent wall magic: Benjamin Moore “Wrought Iron” (2124-10) on one wall creates dramatic contrast that makes those white tiles pop like they do in boutique hotels
- Warm white walls: Sherwin Williams “Alabaster” (SW 7008) keeps the space bright while adding warmth that pure white can’t achieve
- Ceiling sophistication: Benjamin Moore “Cloud White” (OC-130) reflects light beautifully and makes your patterned tiles the star
Budget Range: $4,500-$7,500 | Timeline: 2-3 weeks | Best For: Powder rooms and guest bathrooms
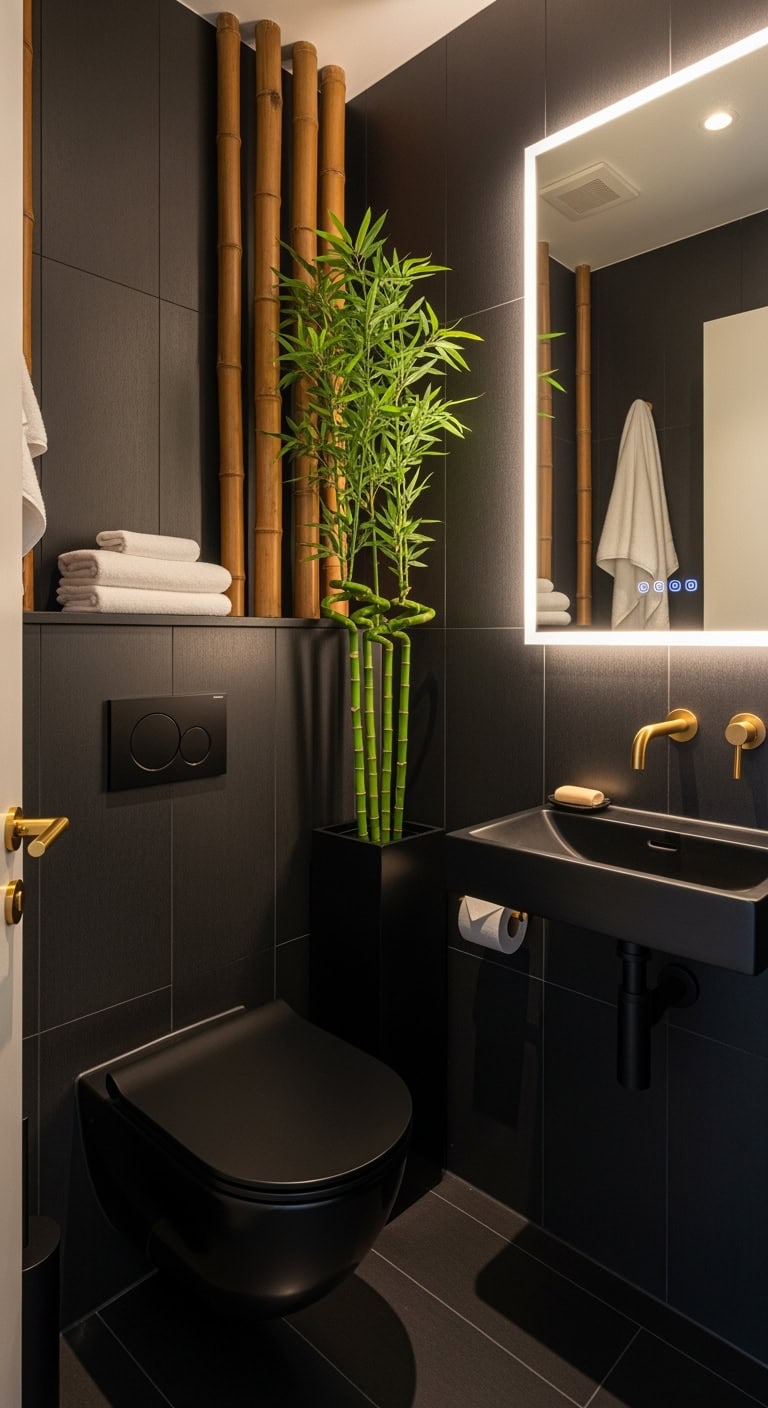
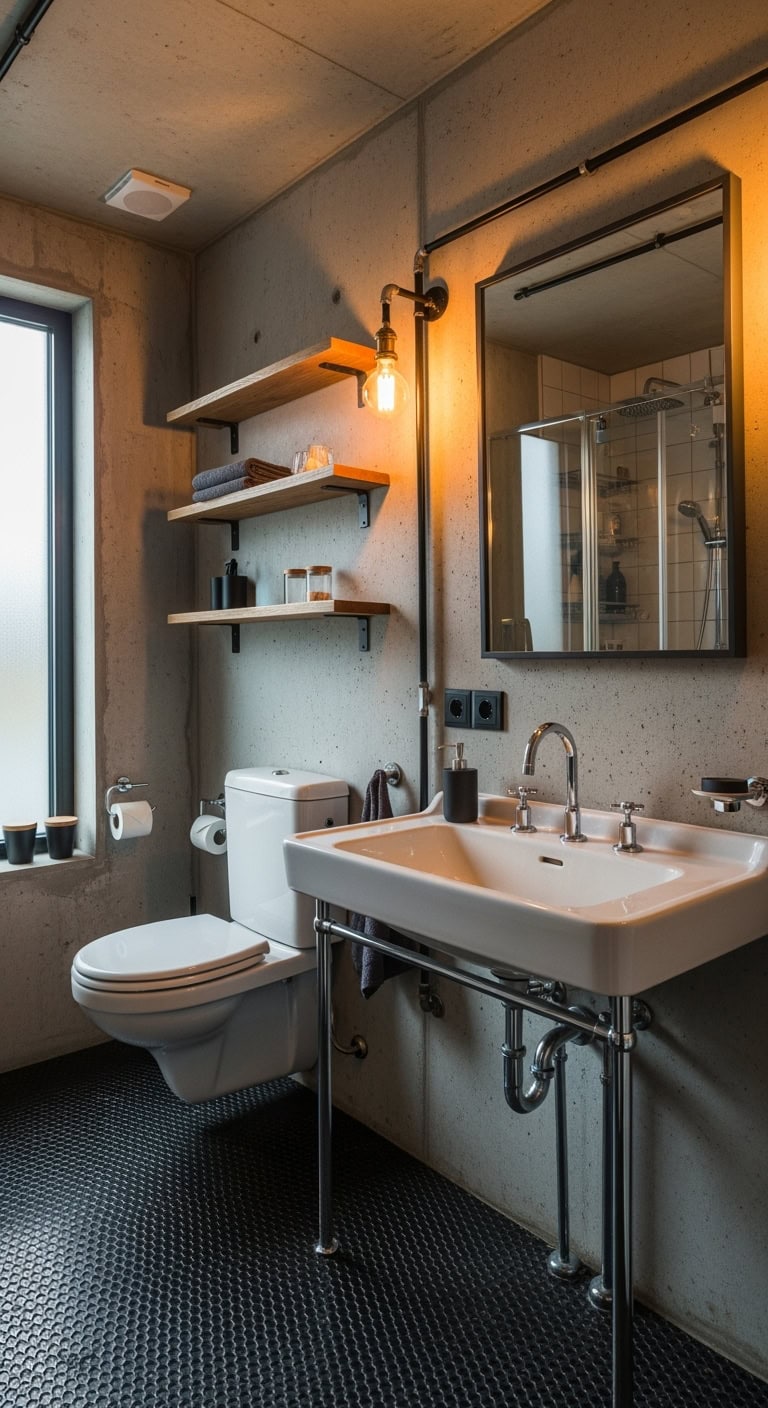
Industrial Luxe: Matte Black Tiles With Exposed Copper Piping
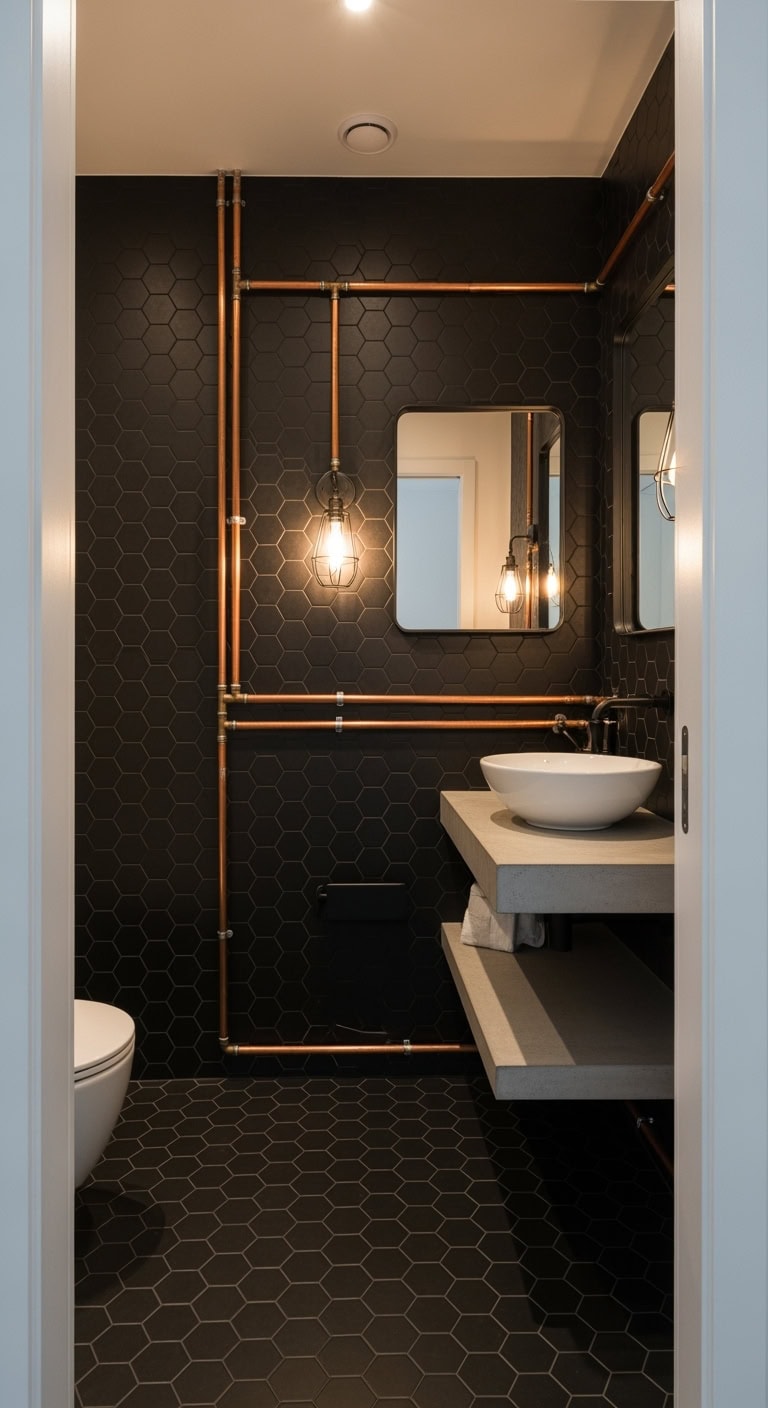
This style hits like your favorite downtown loft-turned-coffee-shop—raw yet refined, with that perfect mix of edge and elegance. Matte black tiles paired with exposed copper pipes create the same vibe as wearing vintage band tees with designer heels. It’s giving Brooklyn brownstone meets West Coast wellness studio.
Shop The Look:
- Industrial vanity with concrete or black metal base
- Oversized rectangular mirror with thin black frame
- Edison bulb cage pendant or black track lighting
- Open metal shelving unit with wood accents
- Charcoal grey memory foam bath mat
- Black and white striped Turkish towels (set of 6)
- Clear or white fabric shower curtain with black grommets
- Copper soap dispenser and candle holders set
- Matte black faucet and towel bar hardware
DIY Paint Transformation
- Accent wall power: Paint one wall in “Iron Ore” (Sherwin Williams SW 7069) to amplify the industrial mood and make copper pipes pop like jewelry against dark fabric.
- Balance the darkness: Apply “Alabaster” (Sherwin Williams SW 7008) on remaining walls for that gallery-white contrast that keeps the space from feeling cave-like.
- Unexpected ceiling: Try “Dorian Gray” (Sherwin Williams SW 7017) overhead for a cocoon effect that makes morning routines feel intentionally moody.
Budget Range: $4,500-$7,500 | Timeline: 2-3 weeks | Best For: Master bathrooms with natural light
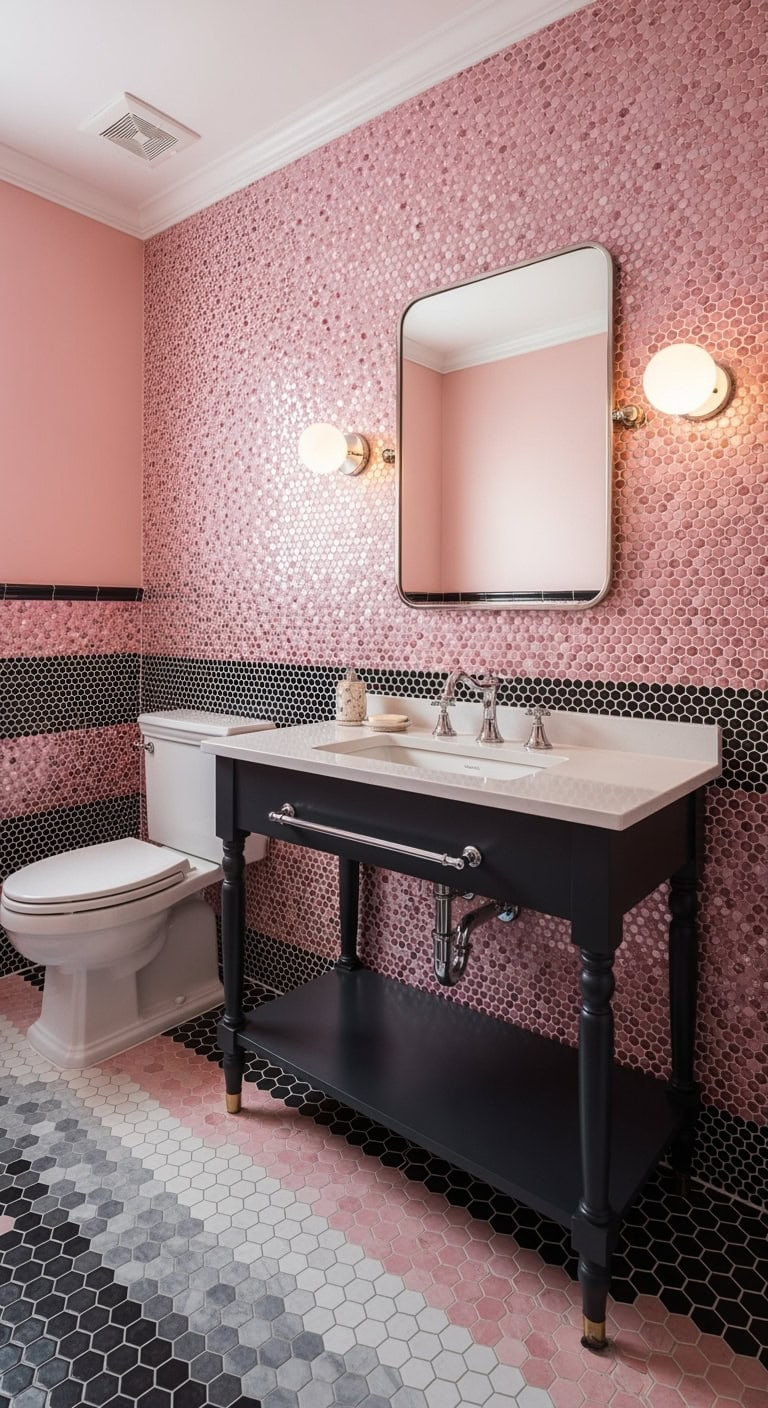
Coastal Retreat: Penny Round Tiles Creating Wave Patterns
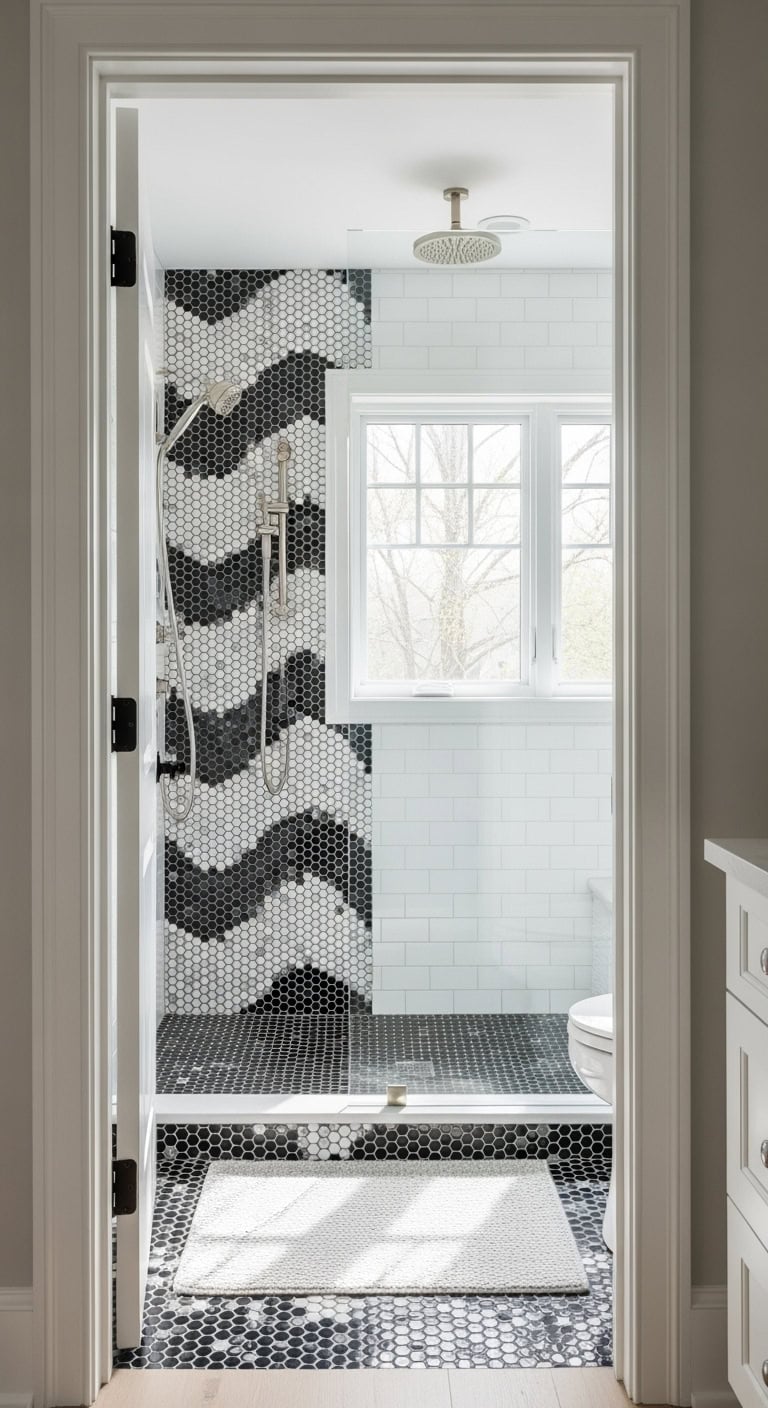
Those penny round tiles are giving major Amalfi Coast hotel vibes—the kind where your morning routine feels like vacation. Picture the classic black and white pattern creating gentle waves across your walls, like that striped Zara dress that goes with everything. This coastal-chic style brings that breezy, put-together energy to your space.
Shop The Look:
- White shaker-style vanity with marble-look quartz top
- Rope-framed round mirror (30″ diameter)
- Nautical cage pendant light in brushed nickel
- White beadboard storage cabinet with glass doors
- Navy and white striped cotton bath mat
- Turkish cotton towels in crisp white and navy (set of 6)
- White waffle-weave shower curtain with navy trim
- Ceramic soap dispenser set with rope detail
- Brushed nickel faucet and cabinet hardware
DIY Paint Transformation
- Accent wall magic: Benjamin Moore “Hale Navy” (HC-154) on one wall creates that sophisticated contrast against penny tiles—like adding a blazer to your favorite jeans
- Main walls: Sherwin Williams “Sea Salt” (SW-6204) brings in that subtle coastal green that everyone’s obsessing over on Instagram stories
- Trim and ceiling: Benjamin Moore “Cloud White” (OC-130) keeps everything crisp and makes your penny tiles the star of the show
Budget Range: $4,500-$7,500 | Timeline: 2-3 weeks | Best For: Guest bathrooms and powder rooms
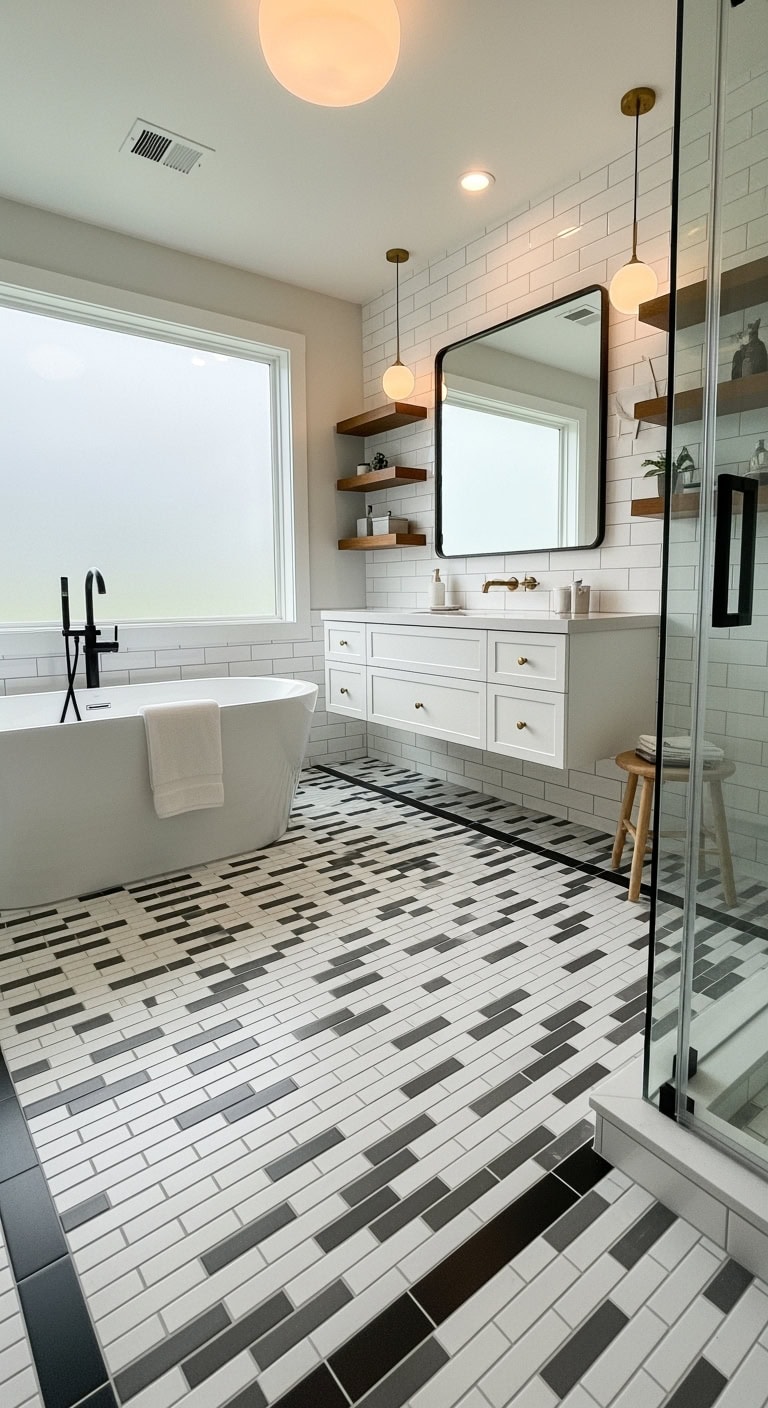
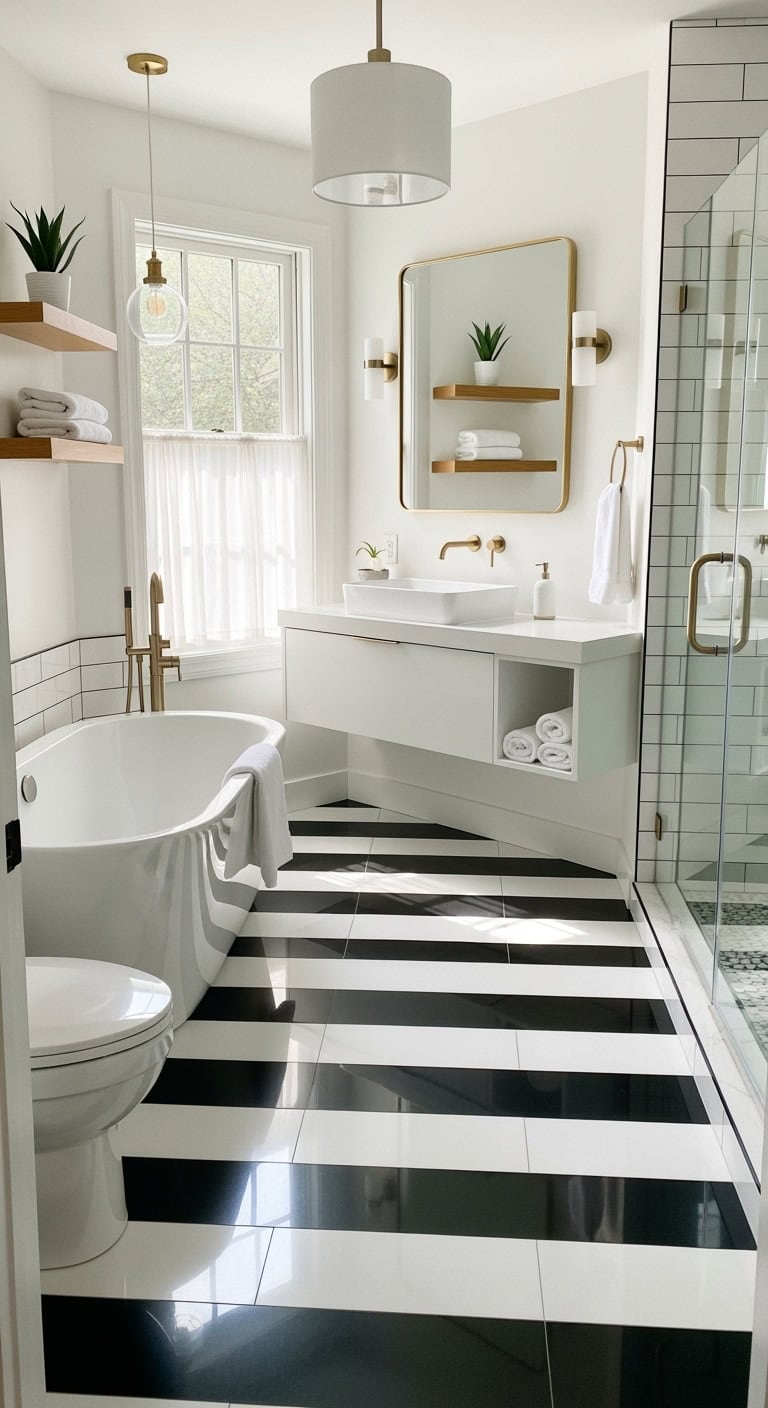
Mid-Century Modern: Retro Checkerboard Floors With Floating Vanities

That Mad Men aesthetic meets your morning coffee ritual—sleek floating vanities and bold checkerboard floors that feel like your favorite retro diner got a luxury upgrade. This is the bathroom version of vintage Levi’s paired with a designer blazer: timeless cool that never tries too hard. It’s giving Palm Springs poolside energy while being practical enough for rushed mornings.
Shop The Look:
- Walnut floating vanity with integrated white sink (48″ width)
- Rectangular mirror with thin black metal frame (30″ x 40″)
- Globe pendant lights with brass fixtures (set of 2)
- Wall-mounted medicine cabinet with mirror front
- Black and white striped bath mat
- White terry cloth towels with black trim (set of 6)
- Clear or white fabric shower curtain with black edge
- Ceramic planter, soap pump, and vintage-style glass jars
- Matte black faucet and drawer pulls set
DIY Paint Transformation
- Accent wall behind vanity: Benjamin Moore “Wrought Iron” (2124-10) creates that perfect charcoal backdrop that makes your floating vanity pop like a gallery piece.
- Main bathroom walls: Sherwin Williams “Pure White” (SW 7005) keeps things crisp and clean—the ideal canvas for those dramatic black and white tiles.
- Ceiling statement: Benjamin Moore “Cloud White” (OC-130) adds subtle warmth overhead without yellowing, perfect for those getting-ready selfies.
Budget Range: $4,500-$7,500 | Timeline: 2-3 weeks | Best For: Guest bathrooms and powder rooms
Traditional Classic: Marble-Look Porcelain With Ornate Borders
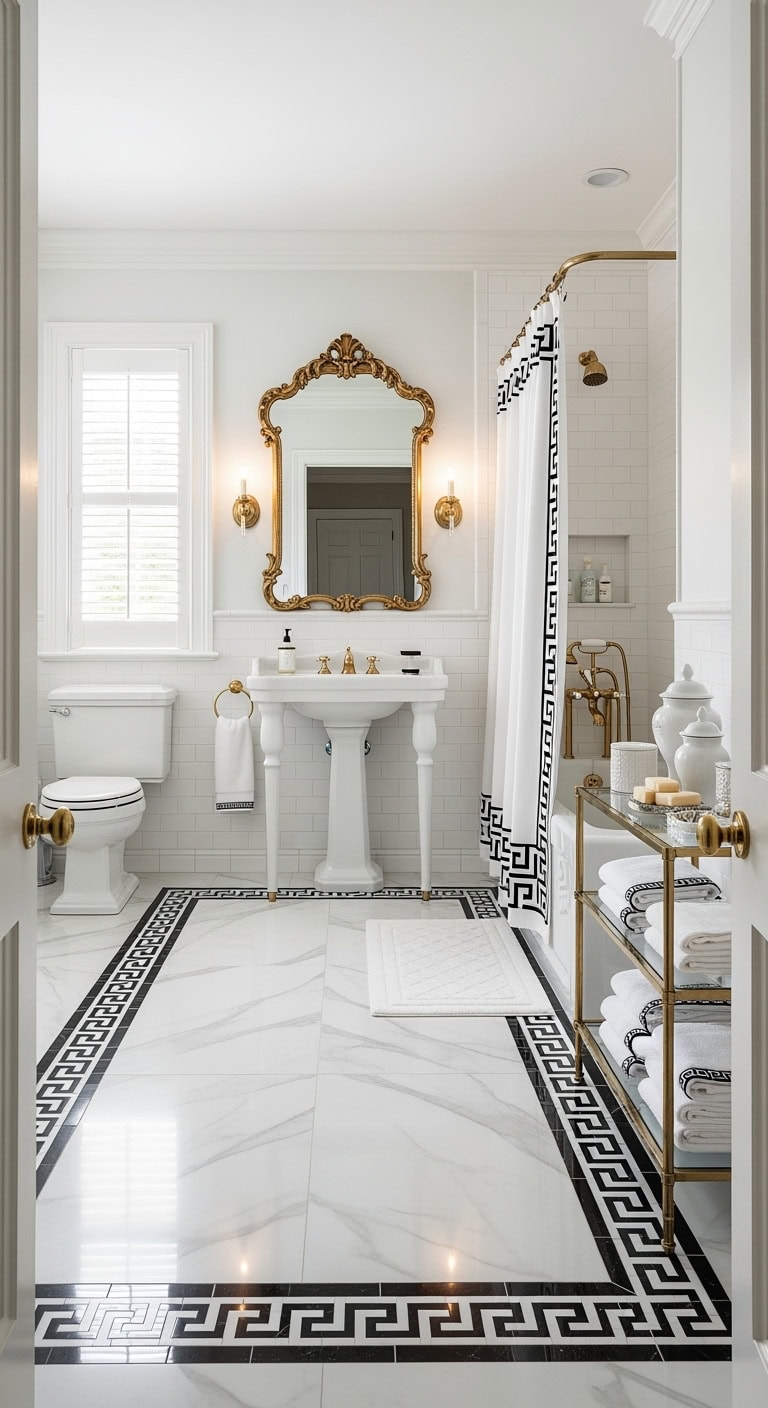
That vintage hotel powder room aesthetic from Bridgerton meets your downtown apartment. Marble-look porcelain brings luxury without the trust fund price tag, while ornate borders add that collected-over-time sophistication your book club friends will obsess over. It’s timeless elegance that works whether you’re renting or renovating.
Shop The Look:
- White pedestal sink or console vanity with brass legs
- Ornate gold or silver-framed mirror (rectangular with decorative edges)
- Crystal wall sconces or mini chandelier
- Glass shelving unit with brass or chrome frame
- Plush white cotton bath mat with subtle pattern
- Turkish cotton towels in white with black trim (set of 6)
- White fabric shower curtain with black Greek key border
- Porcelain soap dish, tissue box cover, and apothecary jars
- Brass or polished chrome traditional cross-handle faucet
DIY Paint Transformation
- Accent wall sophistication: Paint one wall in “Iron Ore” (Sherwin Williams SW 7069) to create that dramatic gallery wall effect behind your vintage mirror collection.
- Classic backdrop: Cover main walls with “Cloud White” (Benjamin Moore OC-130) for that crisp, museum-quality background that makes black tile borders pop.
- Crown molding trick: Add “Simply White” (Benjamin Moore OC-117) on trim and ceiling to fake architectural details in basic builder-grade bathrooms.
Budget Range: $4,500-$8,000 | Timeline: 2-3 weeks | Best For: Guest bathrooms and powder rooms
Contemporary Spa: Large Scale Tiles With Seamless Glass Shower Enclosures
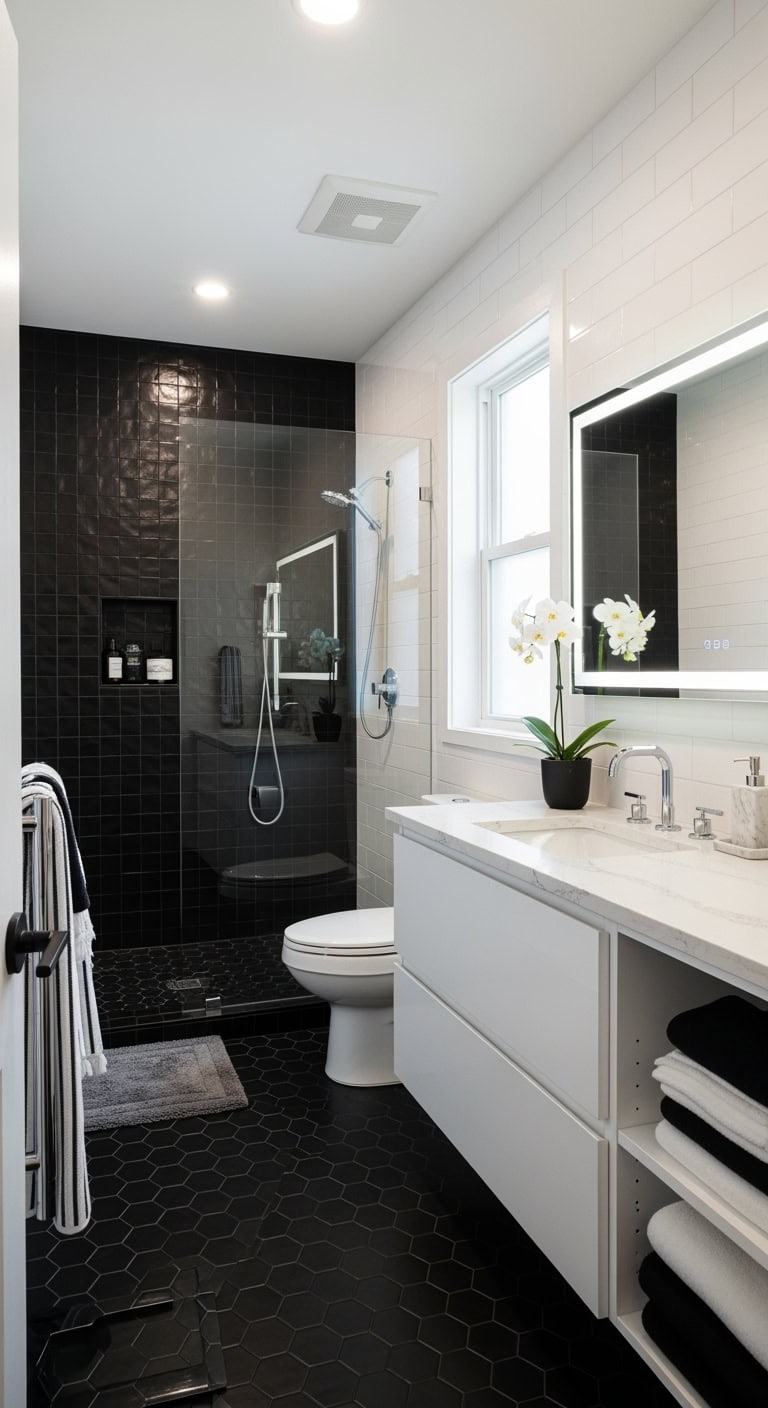
Those sleek, oversized tiles you keep seeing at boutique hotels create that uncluttered, expensive look without the marble price tag. The frameless glass shower makes your space feel twice as big—like switching from a cluttered handbag to a minimalist tote.
Shop The Look:
- Wall-mounted floating vanity with integrated sink (60″ white lacquer)
- LED backlit rectangular mirror (48″ x 36″)
- Linear chrome vanity light bar or recessed ceiling spots
- Wall-mounted medicine cabinet with mirrored doors
- Plush memory foam bath mat in charcoal grey
- Turkish cotton towel set in white and black (6 pieces)
- Clear weighted shower liner (no curtain needed)
- Marble soap dispenser and tray set in black/white
- Chrome rainfall showerhead and handheld combo
DIY Paint Transformation
- Accent wall behind vanity: Benjamin Moore “Iron Mountain” (2134-30) adds drama without overwhelming—that sophisticated charcoal that makes white fixtures look crisp and expensive
- Main bathroom walls: Sherwin Williams “Pure White” (SW 7005) keeps everything bright and clean, the perfect backdrop for those getting-ready videos
- Trim and ceiling: Benjamin Moore “Chantilly Lace” (OC-65) for that barely-there contrast that professional designers use to add depth
Budget Range: $8,000-$12,000 | Timeline: 2-3 weeks | Best For: Master bathrooms
Vintage Charm: Basketweave Patterns With Clawfoot Tub Features
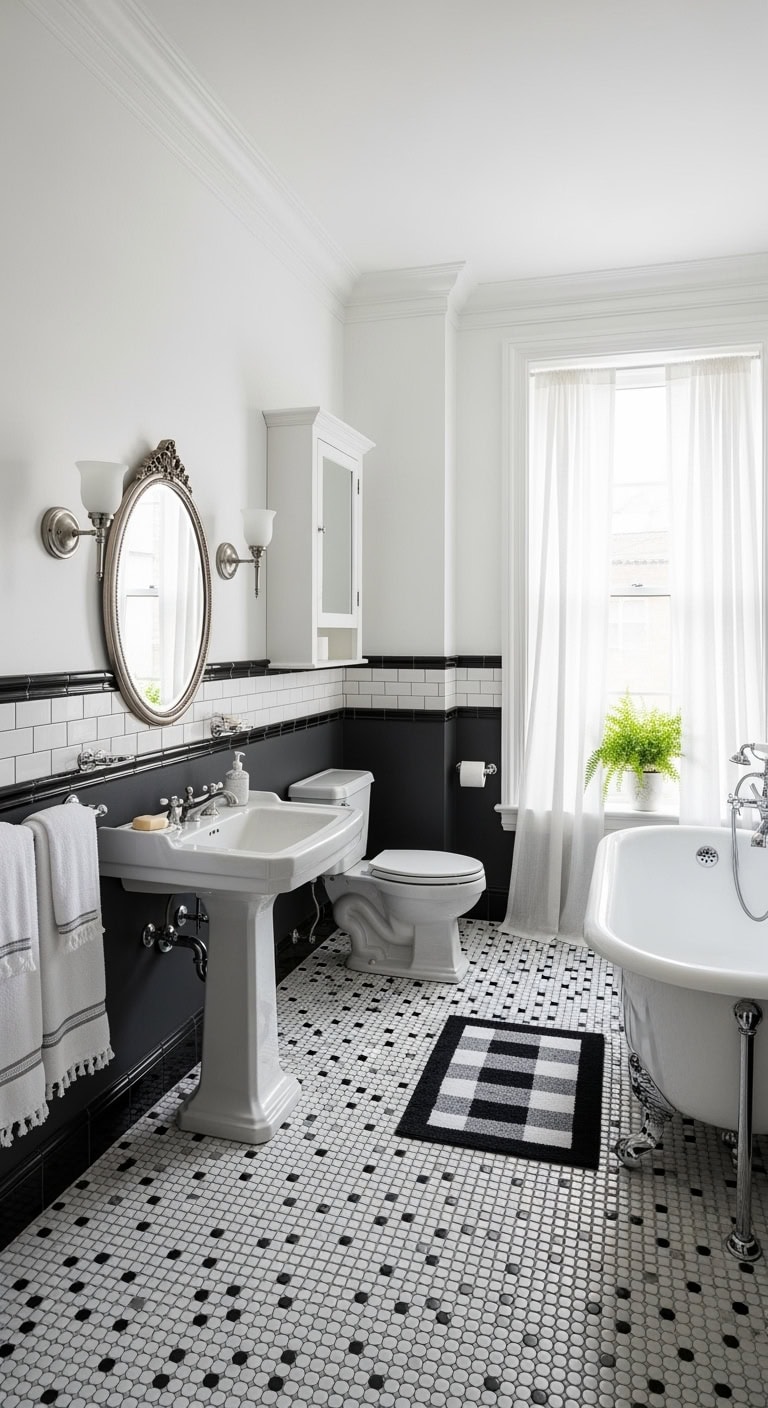
That vintage powder room aesthetic from Downton Abbey meets modern functionality—like wearing your grandmother’s pearls with Target jeans. The basketweave pattern reads timeless elegance while the clawfoot tub screams Saturday wine-and-Netflix soaks.
Shop The Look:
- Pedestal sink with chrome cross handles (classic Victorian style)
- Ornate oval mirror with decorative frame (antique brass or silver)
- Double wall sconce with milk glass shades
- White painted medicine cabinet with mirror door
- Black and white checkered bath mat
- Turkish cotton towels in crisp white (set of 6)
- White waffle-weave shower curtain with black trim
- Porcelain soap dish, tumbler, and tissue box cover set
- Chrome vintage-style faucet handles and towel bars
DIY Paint Transformation
- Wainscoting zone: Paint lower walls in “Iron Ore” (Sherwin Williams SW 7069) for that dramatic contrast that makes your basketweave tile pop like a coffee shop bathroom you’d actually photograph.
- Upper walls: Go with “Alabaster” (Sherwin Williams SW 7008) above the chair rail—it’s the perfect warm white that won’t clash with your vintage fixtures.
- Trim and ceiling: Use “Pure White” (Benjamin Moore OC-64) for all woodwork and ceiling to create that crisp, gallery-like frame around your vintage elements.
Budget Range: $4,500-$7,500 | Timeline: 2-3 weeks | Best For: Guest bathrooms and powder rooms
Transitional Style: Mixed Tile Sizes Creating Dynamic Wall Designs
This style is like mixing your grandmother’s vintage subway tile with modern geometric patterns—the bathroom version of wearing vintage Levi’s with a designer blazer. You get that collected-over-time look without actually waiting years, perfect for when your style falls somewhere between traditional and trendy. It’s what happens when HGTV meets your local coffee shop’s exposed brick wall.
Shop The Look:
- White shaker vanity with marble-look quartz top
- Rectangular black-framed mirror with grid detail
- Industrial-style vanity light with Edison bulbs
- Open wood and metal shelving unit
- Black and white geometric bath mat
- Mixed black and white Turkish towels (set of 6)
- White waffle-weave shower curtain with black trim
- Matte black soap dispenser and canister set
- Brushed gold cabinet hardware and towel hooks
DIY Paint Transformation
- Accent wall strategy: Benjamin Moore “Wrought Iron” (2124-10) on the wall behind your vanity creates instant depth and makes white tile patterns pop like they do in those Brooklyn brownstone tours.
- Main wall coverage: Sherwin Williams “Alabaster” (SW 7008) keeps things bright while adding just enough warmth to prevent that sterile doctor’s office feeling.
- Trim and ceiling detail: Benjamin Moore “Cloud White” (OC-130) on trim and ceiling adds subtle contrast that makes your mixed tile sizes look intentional rather than random.
Budget Range: $4,500-$7,500 | Timeline: 2-3 weeks | Best For: Master bathrooms needing personality
French Country: Arabesque Tiles With Distressed White Cabinetry
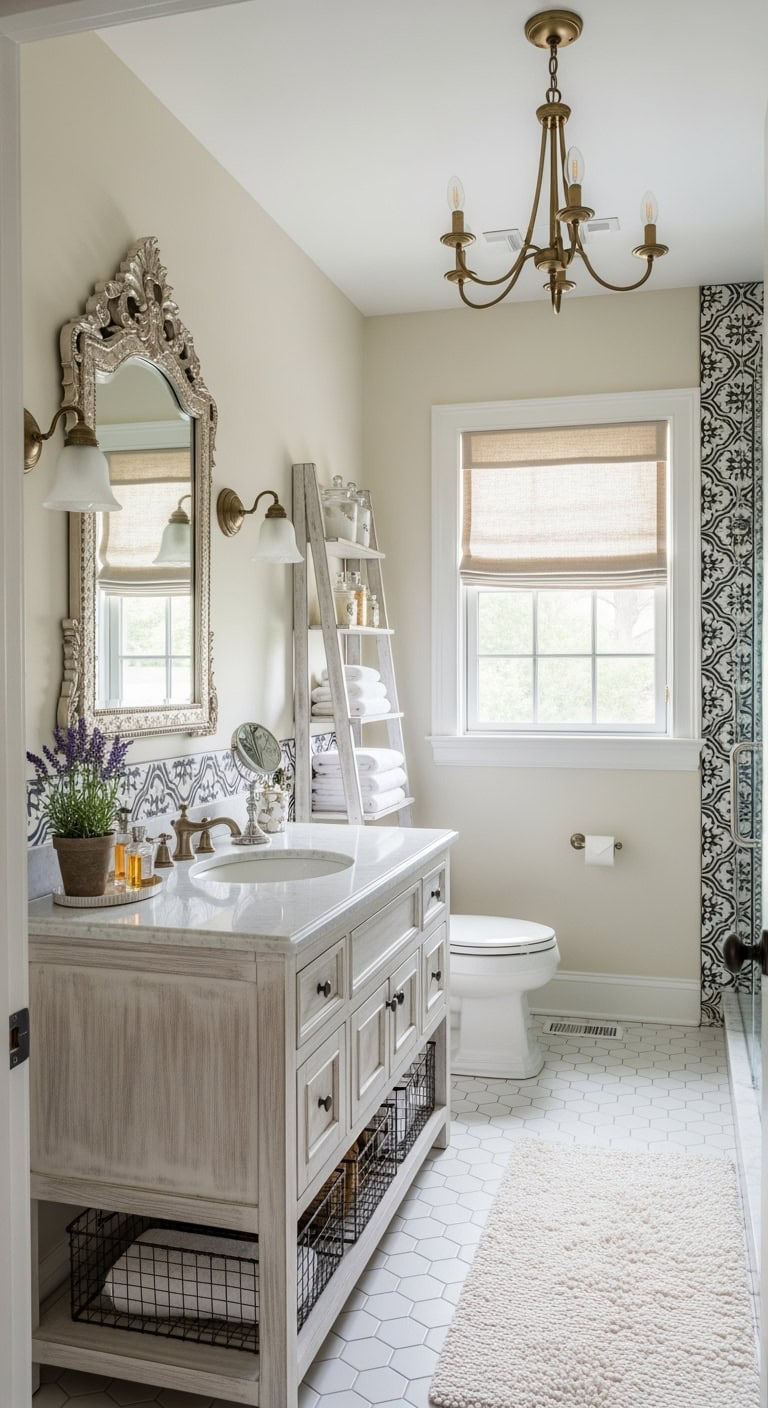
That Parisian apartment bathroom you screenshot every time it pops up on Instagram? Arabesque tiles plus distressed cabinetry creates the same romantic-meets-rustic vibe as your favorite French girl aesthetic boards. It’s giving countryside château meets city sophistication—basically what happens when farmhouse style studies abroad.
Shop The Look:
- Distressed white wood vanity with marble or quartz top
- Ornate vintage-style mirror with aged gold or silver frame
- French-inspired chandelier or lantern pendant in antique brass
- Whitewashed wood cabinet with glass doors or open shelving
- Plush white cotton bath mat with subtle texture
- Linen towels in white and soft gray (set of 6)
- White ruffled or linen shower curtain with delicate trim
- Ceramic apothecary jars and vintage-style soap dispenser set
- Antique brass or oil-rubbed bronze faucet and drawer pulls
DIY Paint Transformation
- Walls: Benjamin Moore “White Dove” OC-17 creates that perfect French plaster look—creamy enough to feel warm but still reads as white in photos
- Vanity refresh: Annie Sloan Chalk Paint in “Old White” for authentic distressing that looks inherited, not DIY’d
- Accent trim: Sherwin Williams “Alabaster” SW 7008 on window frames and baseboards adds subtle definition without harsh contrast
Budget Range: $4,500-$7,500 | Timeline: 2-3 weeks | Best For: Primary bathrooms in traditional homes
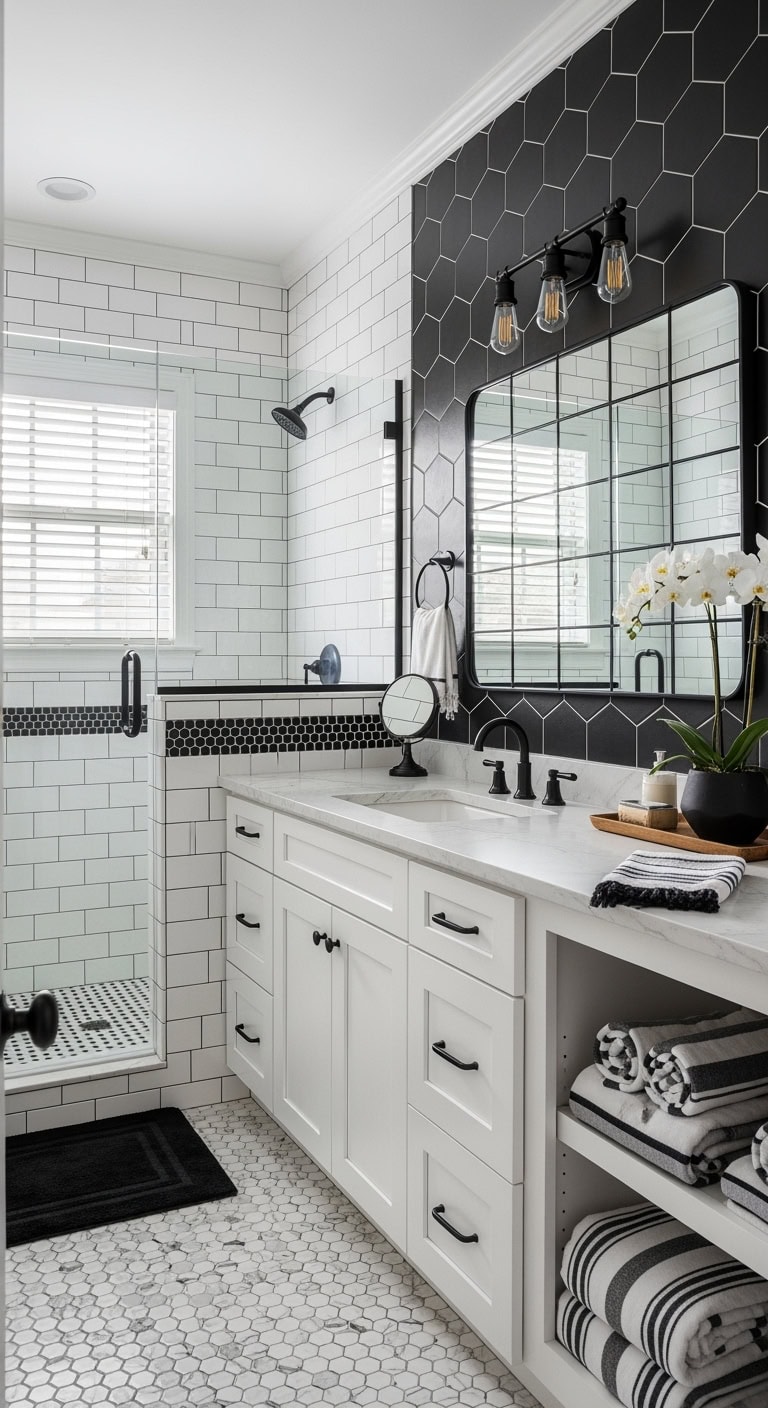
Urban Sophistication: Graphic Tile Patterns With Matte Black Hardware
That sleek coffee shop bathroom aesthetic you love translates perfectly at home with graphic tiles and matte black details. Like pairing a leather jacket with ballet flats, this style mixes edge with elegance for a look that photographs beautifully and ages even better.
Shop The Look:
- Matte black floating vanity with white vessel sink
- Black metal framed rectangular mirror (24″ x 36″)
- Industrial cage pendant light in matte black finish
- Open metal shelving unit with wood shelves
- Black and white geometric patterned bath mat
- Crisp white Turkish cotton towels with black trim (set of 6)
- White waffle-weave shower curtain with black grommets
- Matte black soap dispenser and canister set
- Black cabinet hardware and towel bar upgrade kit
DIY Paint Transformation
- Accent wall power: Benjamin Moore “Wrought Iron” (2124-10) on one wall creates that moody backdrop your white tiles will pop against, like the chalkboard walls at your favorite brunch spot.
- Main walls: Sherwin Williams “Pure White” (SW 7005) keeps things crisp and clean while letting your graphic tiles be the star—this is the shade every influencer uses.
- Ceiling statement: Benjamin Moore “Cloud White” (OC-130) softens the contrast slightly and prevents that harsh box feeling in smaller spaces.
Budget Range: $4,000-$7,000 | Timeline: 2-3 weeks | Best For: Master bathrooms and powder rooms
Eclectic Mix: Combining Multiple Tile Shapes for Statement Walls
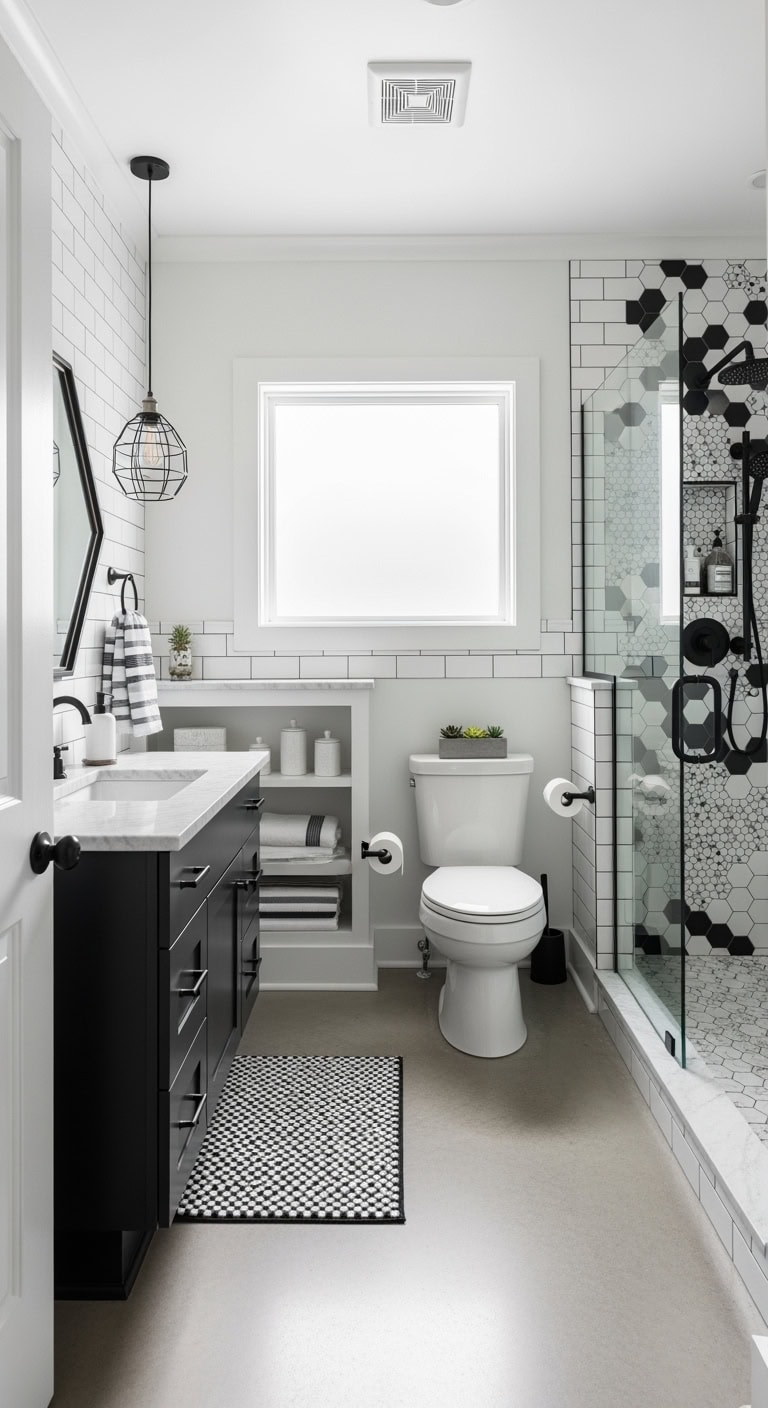
Picture your favorite boutique hotel bathroom meets that vintage-inspired coffee shop where everything feels curated but not precious. Mixing hexagons with subway tiles and maybe some penny rounds creates the same energy as layering vintage band tees with designer jeans—intentionally mismatched but somehow perfect.
Shop The Look:
- Matte black floating vanity with marble-look quartz top
- Asymmetrical geometric mirror with black frame
- Industrial cage pendant light in matte black finish
- Open shelving unit with black metal frame and wood shelves
- Black and white geometric patterned bath mat
- Classic white Turkish cotton towels with black stripe detail
- White waffle-weave shower curtain with black trim
- Ceramic canisters and soap dispenser in matte white
- Matte black faucet set and cabinet hardware
DIY Paint Transformation
- Accent wall behind vanity: Benjamin Moore “Black Beauty” (2128-10) creates that dramatic gallery wall effect you’ve been double-tapping on Instagram
- Main bathroom walls: Sherwin Williams “Pure White” (SW 7005) keeps the space bright while letting your tile work steal the show
- Ceiling and trim: Benjamin Moore “Cloud White” (OC-130) adds subtle warmth that prevents the black elements from feeling too harsh
Budget Range: $4,500-$7,500 | Timeline: 2-3 weeks | Best For: Powder rooms and guest bathrooms
Classic Checkerboard Floor Patterns
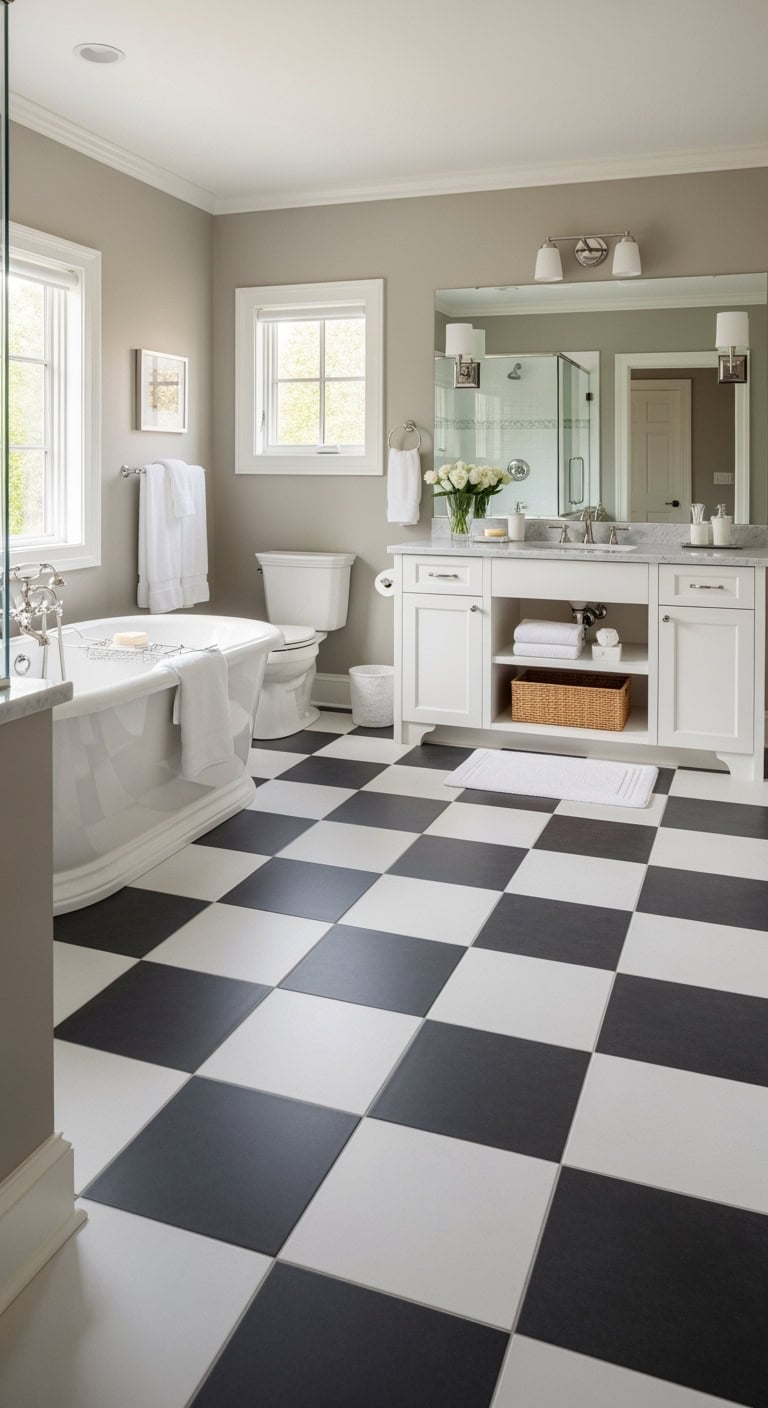
Picture yourself stepping into a bathroom that feels like a vintage chess board came to life! The classic checkerboard floor instantly transforms your space into a timeless showstopper that never goes out of style.
Here’s how to nail this iconic look:
- Tile Size: Go with 12″ squares for standard bathrooms, 18″ for spacious ones
- Grout Color: Choose light gray to soften the contrast
- Layout: Start with a full tile at the door’s center
- Border Options: Add a solid black perimeter for extra definition
- Diagonal Twist: Rotate 45 degrees for dynamic energy
Pro Tip: Balance that bold floor by keeping walls neutral – think soft whites or warm grays. This prevents visual overload while letting your checkerboard pattern steal the show!
Traditional Diagonal Checkerboard Layout
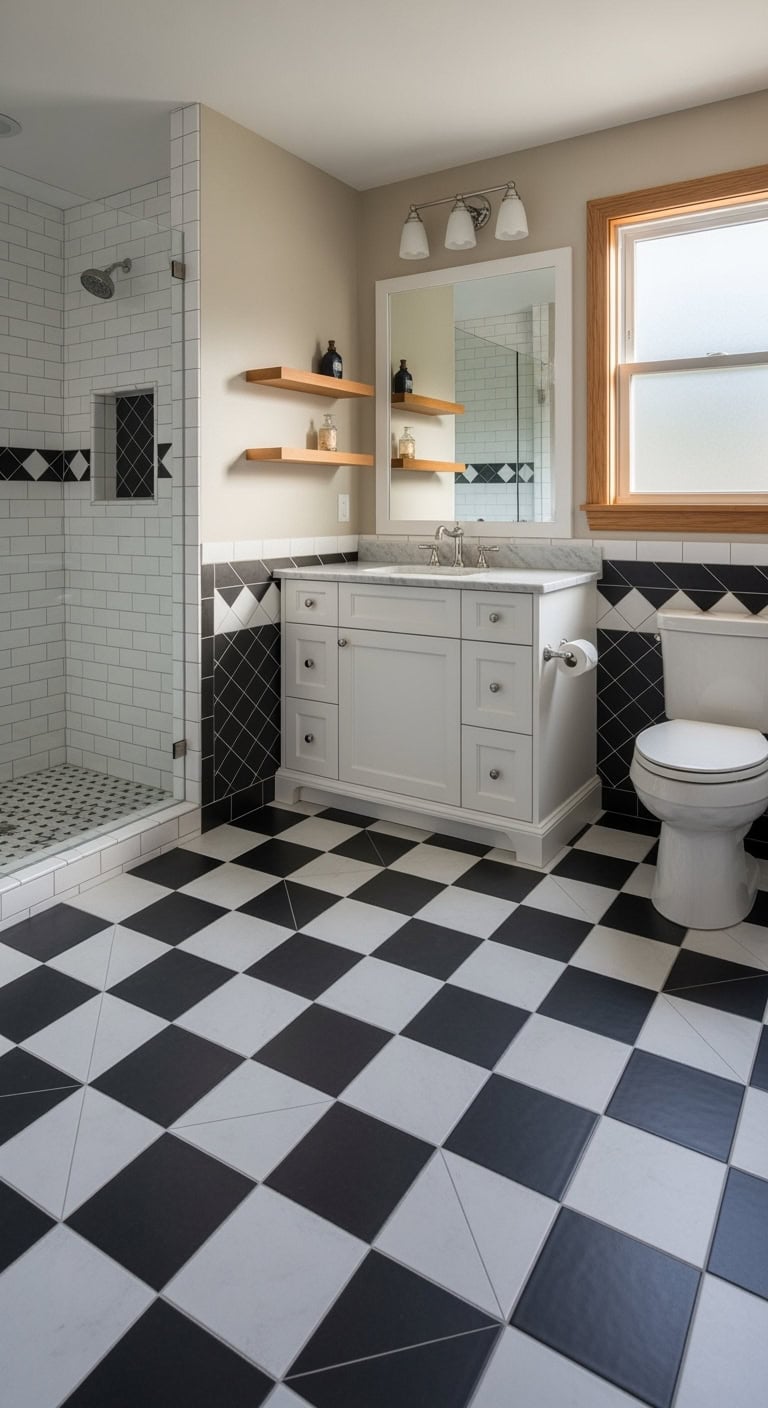
Ready to take your checkerboard game up a notch? The diagonal layout adds instant movement and makes your bathroom feel larger – it’s like magic for small spaces!
Here’s your diagonal playbook:
- Starting Point: Begin at the room’s focal point (usually the vanity)
- Angle: Set tiles at exactly 45 degrees for perfect symmetry
- Edge Treatment: Use triangle cuts along walls for clean lines
- Grout Width: Keep it tight at 1/8″ for seamless flow
- Scale Mix: Combine 8″ and 4″ tiles for added interest
Pro Tip: Diagonal patterns create more waste (plan for 15% extra), but the wow factor is worth it! Mirror this angle in your shower niche or backsplash detail to tie everything together beautifully.
Contemporary Hexagonal Mosaic Design
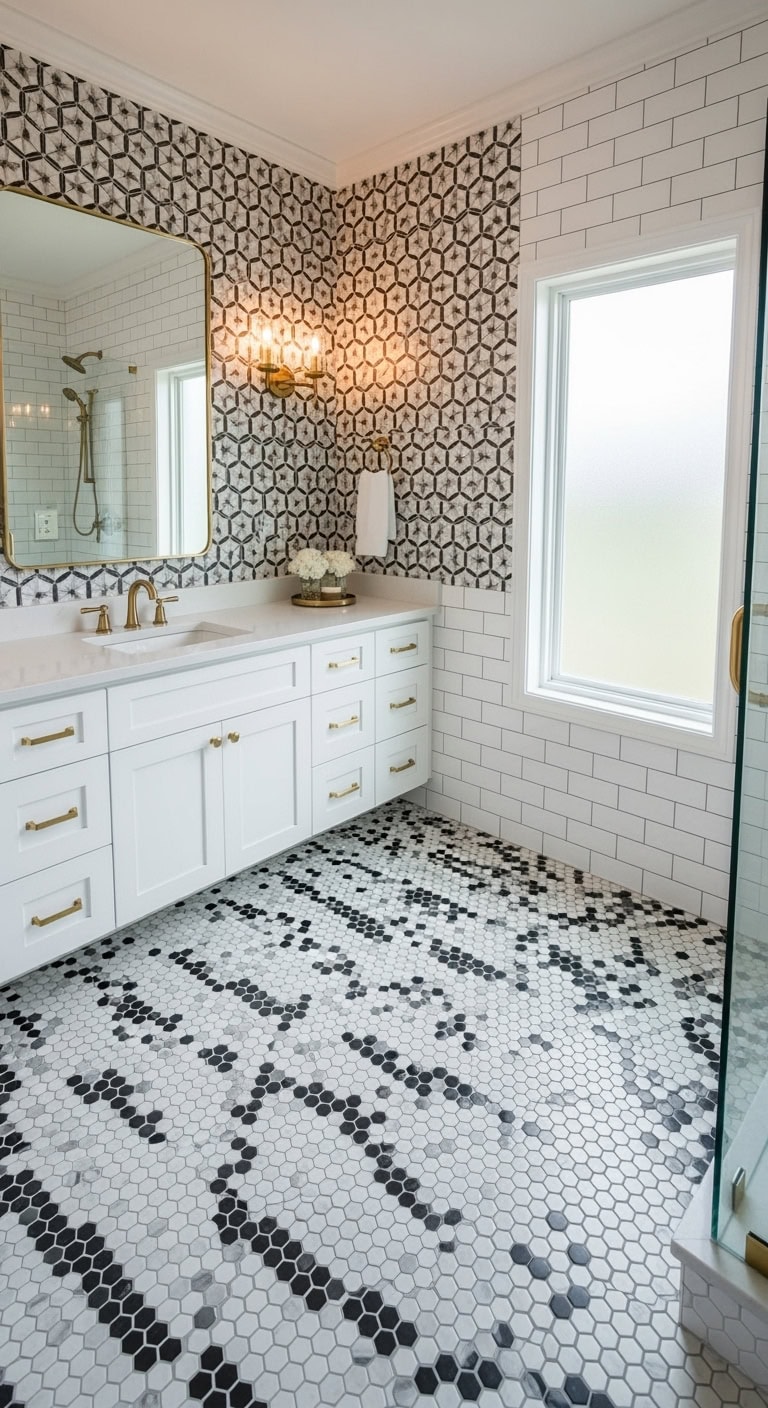
Hexagons are having a major moment, and your bathroom deserves to join the party! These six-sided beauties bring instant sophistication while keeping that classic black and white vibe fresh.
Your hex-cellent design guide:
- Size Options: Mix 1″ minis with 3″ statement pieces
- Pattern Play: Create flowers, honeycomb, or random scatter
- Border Magic: Frame with simple black trim for definition
- Texture Mix: Combine matte black with glossy white
- Accent Zones: Feature behind vanity or shower floor
Pro Tip: Balance busy hex floors with simple subway tile walls – your eyes need a place to rest! For extra drama, continue the hexagon pattern 6″ up the wall as a baseboard alternative. Trust me, it’s the detail that’ll make everyone ask “Where did you find that?!”
Subway Tile Wall Designs
Subway tiles are the little black dress of bathroom design – timeless, versatile, and always stunning! These rectangular classics can transform your walls from boring to brilliant with just a few creative twists.
Your subway style playbook:
- Layout Magic: Stack, brick pattern, or go wild with herringbone
- Grout Game: Dark grout for drama, white for seamless flow
- Size Matters: Traditional 3×6″ or modern 4×12″ planks
- Mix Heights: Combine with wainscoting or floor-to-ceiling coverage
- Accent Strips: Add thin black liner tiles between rows
Pro Tip: Running subway tiles vertically creates the illusion of higher ceilings – perfect for cozy bathrooms! Keep grout lines ultra-thin (1/16″) for a sleek, modern look that won’t steal the show from your gorgeous tile work.
Vertical Stripe Wall Pattern
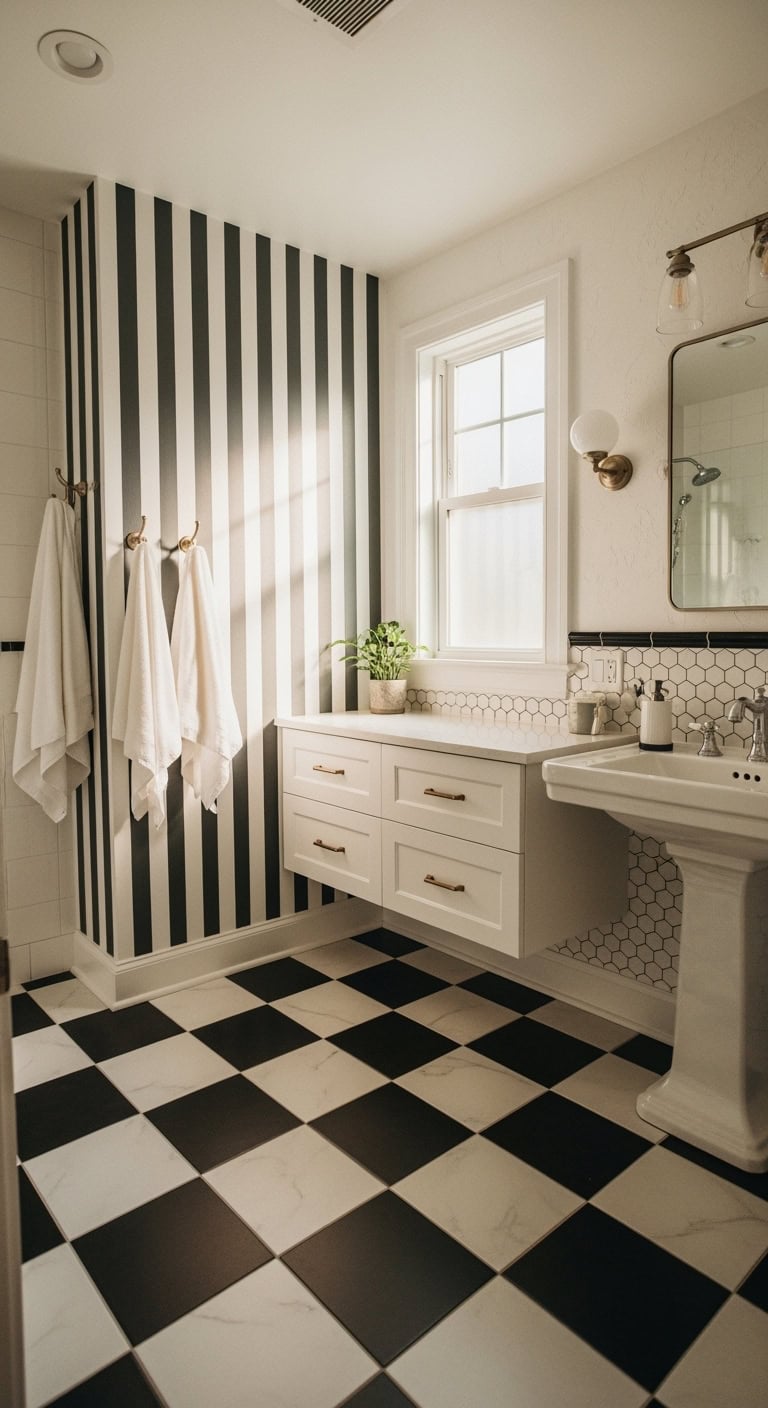
Vertical stripes are your bathroom’s secret weapon for instant sophistication! Think of them as pinstripes for your walls – slimming, elongating, and oh-so-chic.
Your stripe strategy toolkit:
- Width Play: Alternate thick and thin bands for rhythm
- Height Tricks: Run floor-to-ceiling for dramatic impact
- Feature Wall: Choose one wall to avoid dizzy overload
- Contrast Levels: Bold 50/50 or subtle 70/30 ratios
- Border Breaks: Cap with horizontal bands at ceiling/floor
Pro Tip: Keep stripe widths in odd numbers (3″, 5″, 7″) – your eye finds this more pleasing than even measurements. For small bathrooms, stick to just one striped accent wall behind the vanity to create a focal point without overwhelming the space!
Geometric Border Accent Details
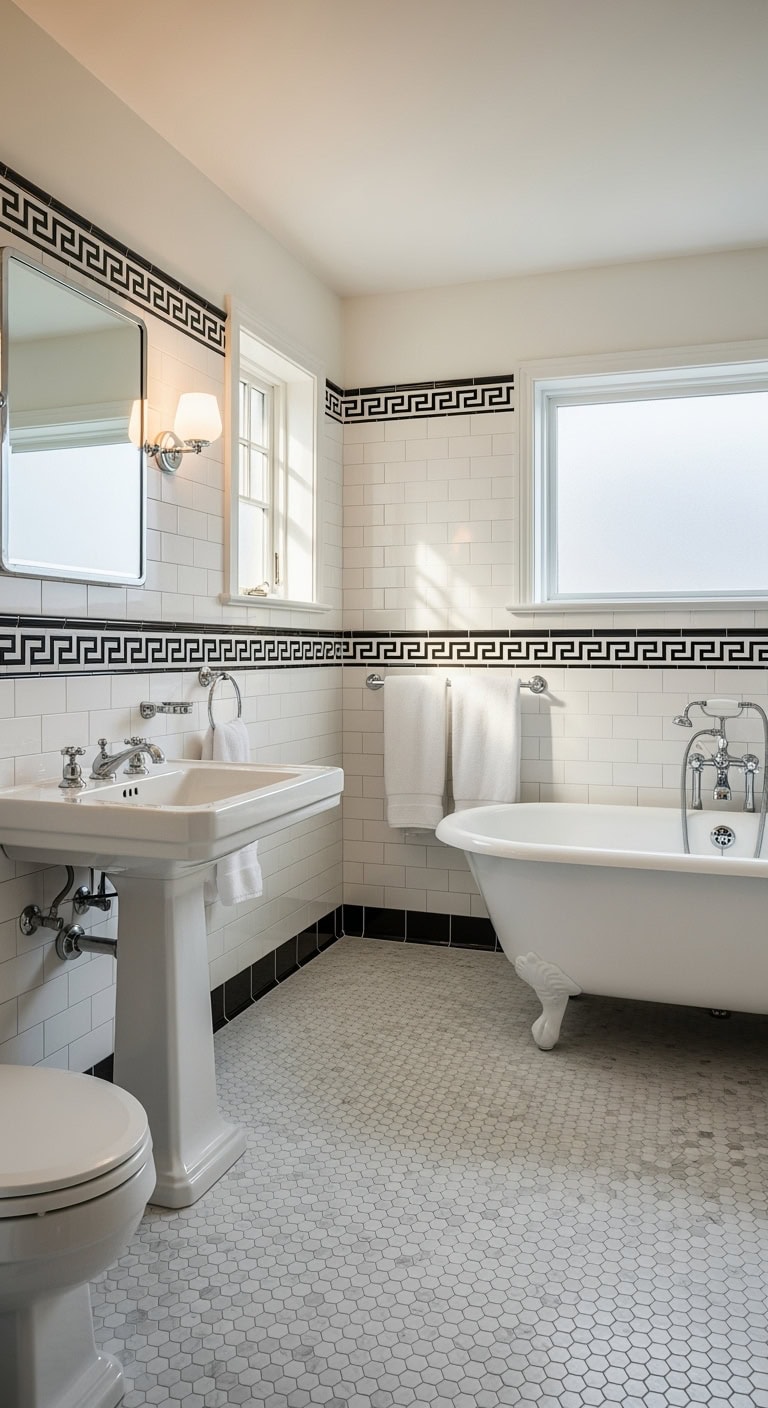
Geometric borders are like the perfect frame for your bathroom masterpiece – they tie everything together with mathematical precision and artistic flair!
Your border brilliance blueprint:
- Greek Key Glory: Timeless zigzag patterns for classic elegance
- Diamond Chains: Interlocking shapes create continuous flow
- Hex Appeal: Honeycomb borders add modern edge
- Chevron Charm: V-patterns point the way to style
- Mixed Motifs: Combine squares and dots for playful rhythm
Pro Tip: Keep your border width between 4-6 inches for maximum impact without stealing the show. Place them at chair-rail height (32-36″ from floor) to break up wall space beautifully, or use as a division between floor patterns and wall tiles. Your bathroom will look custom-designed without the custom price tag!
Marble Penny Round Combinations

Your penny-perfect combos:
- Carrara Clouds: White marble pennies with charcoal grout lines
- Nero Mix: Black marble dots create moody sophistication
- Salt & Pepper: Alternate black and white for retro diner vibes
- Border Buddy: Frame larger tiles with penny round borders
- Gradient Magic: Fade from white to grey to black pennies
Pro Tip: Use contrasting grout to make penny rounds pop – white grout with black pennies or vice versa creates stunning graphic impact. For marble pennies, seal them twice yearly to keep that luxe look lasting!
Modern Basketweave Floor Design
Your modern basketweave floor is giving serious designer vibes:
- Elongated Twist: Use 1×3″ tiles instead of traditional squares for contemporary stretch
- Matte Finish: Skip the shine – matte black and white feels fresh and hides footprints
- Micro Spacing: Tighter grout lines (1/16″) create seamless sophistication
- Border Break: Add a single row of solid black tiles around the perimeter
- Scale Play: Mix standard basketweave with larger format tiles on walls
Pro Tip: Keep your basketweave pattern running the same direction throughout – no diagonal drama! This creates visual flow and makes your bathroom feel larger. Choose light grey grout to soften the contrast and hide inevitable dirt between cleanings.
Victorian Checkerboard Small Powder Room

Your tiny powder room is channeling major Victorian drama with checkerboard floors:
- Diamond Direction: Rotate tiles 45 degrees for that classic diagonal layout
- Size Matters: Go big with 12″ squares – small tiles make cramped spaces feel busier
- Glossy Glamour: High-shine tiles reflect light and scream vintage luxury
- Black Border: Frame the floor with solid black tiles for authentic period charm
- Brass Accents: Pair with unlacquered brass fixtures for true Victorian opulence
Pro Tip: Balance the bold floor pattern with simple white subway tiles on walls – your guests need somewhere to rest their eyes! Skip patterned wallpaper; let your checkerboard be the star of this jewel-box space.
Art Deco Vanity Backsplash
Your vanity is getting the full Gatsby treatment with Art Deco backsplash magic:
- Fan Tiles: Install scalloped tiles in alternating black and white for that Jazz Age flair
- Metallic Grout: Silver or gold grout lines add just the right amount of sparkle
- Geometric Border: Frame your masterpiece with slim black pencil tiles
- Mirror Match: Choose an octagonal or sunburst mirror to echo the Deco vibe
- Chrome Hardware: Sleek faucets and drawer pulls complete the 1920s glamour
Pro Tip: Keep your vanity countertop simple – white marble or quartz lets your statement backsplash shine without competing for attention. The drama happens vertically, darling!
Herringbone Pattern Master Bath
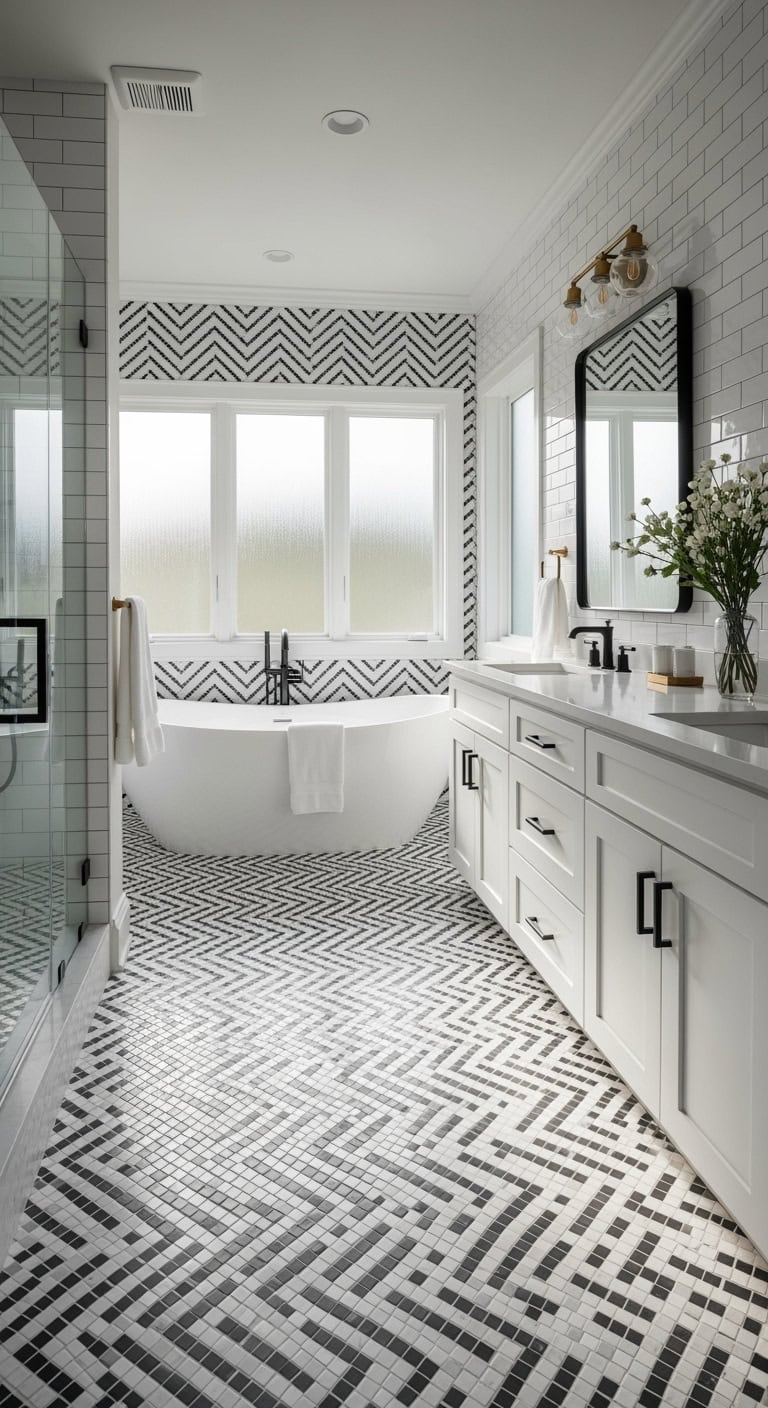
Your master bathroom is about to serve serious sophistication with herringbone patterns that’ll make you feel like royalty every morning:
- Floor Drama: Lay those tiles in classic herringbone for instant elegance and visual flow
- Accent Wall: Create a stunning focal point behind your freestanding tub
- Size Matters: Mix large format tiles on walls with smaller herringbone floors for depth
- White Dominance: Keep the pattern 70% white, 30% black to avoid overwhelming the space
- Natural Light: Position your pattern where sunlight hits – those angles will pop beautifully
Pro Tip: Start your herringbone pattern from the room’s center point, not the walls. This guarantees your pattern looks balanced and intentional, even if your walls aren’t perfectly square!
Graphic Black Grout Lines
Ready to make a statement? Those graphic black grout lines are about to become your bathroom’s secret weapon for serious style:
- Thin & Crisp: Keep grout lines 1/8″ for that sharp, architectural look without overwhelming
- Grid Game: Create perfect squares or subway patterns – the black lines become part of the design
- Contrast Control: Pair with bright white tiles for maximum impact and easy cleaning
- Vertical Magic: Run black grout lines up shower walls to visually heighten your space
- Mixed Metals: Chrome or brass fixtures pop gorgeously against the graphic backdrop
Pro Tip: Test your grout color on a sample board first! What looks subtle in the store might scream “graph paper” once installed. Charcoal gray can be your happy medium if pure black feels too intense.
Minimalist Matte Black Flooring
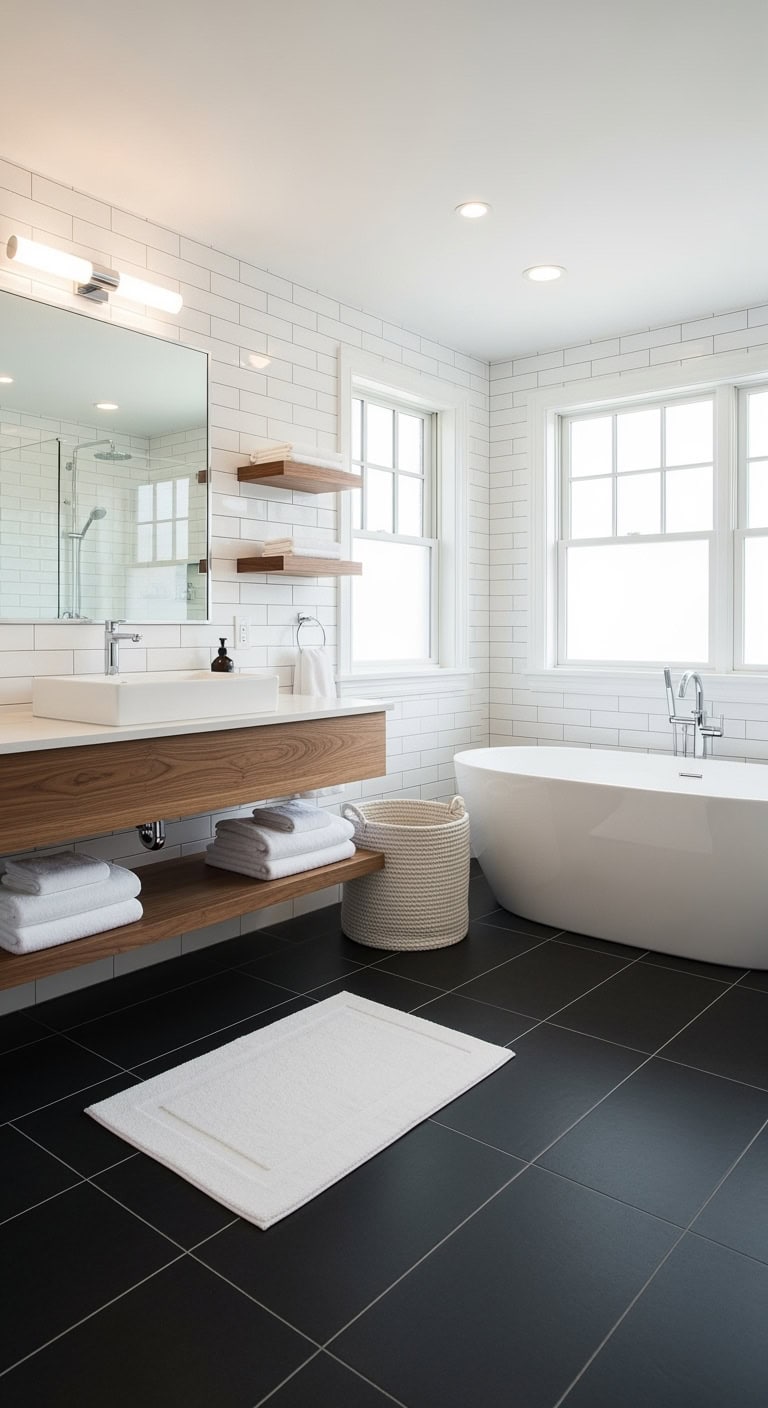
Going dark and moody with your floors? Matte black is having its moment and your bathroom is ready for the drama:
- Zero Shine Zone: That velvety matte finish hides water spots like a boss
- Size Matters: Large format tiles (24″x24″) create seamless sophistication
- Warm It Up: Add natural wood vanities or woven baskets to soften the edge
- Light Balance: White walls and ceiling keep things from feeling cave-like
- Texture Play: Mix in fluffy white towels and plush bath mats for cozy contrast
Pro Tip: Matte black shows dust more than glossy surfaces, so keep a microfiber mop handy. Consider adding radiant floor heating – black tiles can feel chilly on bare feet, but heated floors turn them into a luxury spa experience!
Bold Geometric Floor Medallion

Ready to make your bathroom floor the star of the show? A bold geometric medallion is your ticket to instant wow factor:
- Center Stage: Position your medallion where it’ll shine – dead center or under a freestanding tub
- Pattern Power: Mix hexagons, diamonds, or starbursts for maximum visual punch
- Border Beauty: Frame with simple black tiles to let your medallion pop
- Scale Smart: Choose a size that leaves breathing room – about 1/3 of your floor space
- Echo Elements: Repeat geometric shapes in mirrors or light fixtures for cohesion
Pro Tip: Keep walls and fixtures simple when you’ve got a showstopper floor. Your medallion is the diva here – let it sing solo while everything else plays backup. Consider using the same pattern in a smaller scale for shower niche accent!
Classic Black Vanity Installation
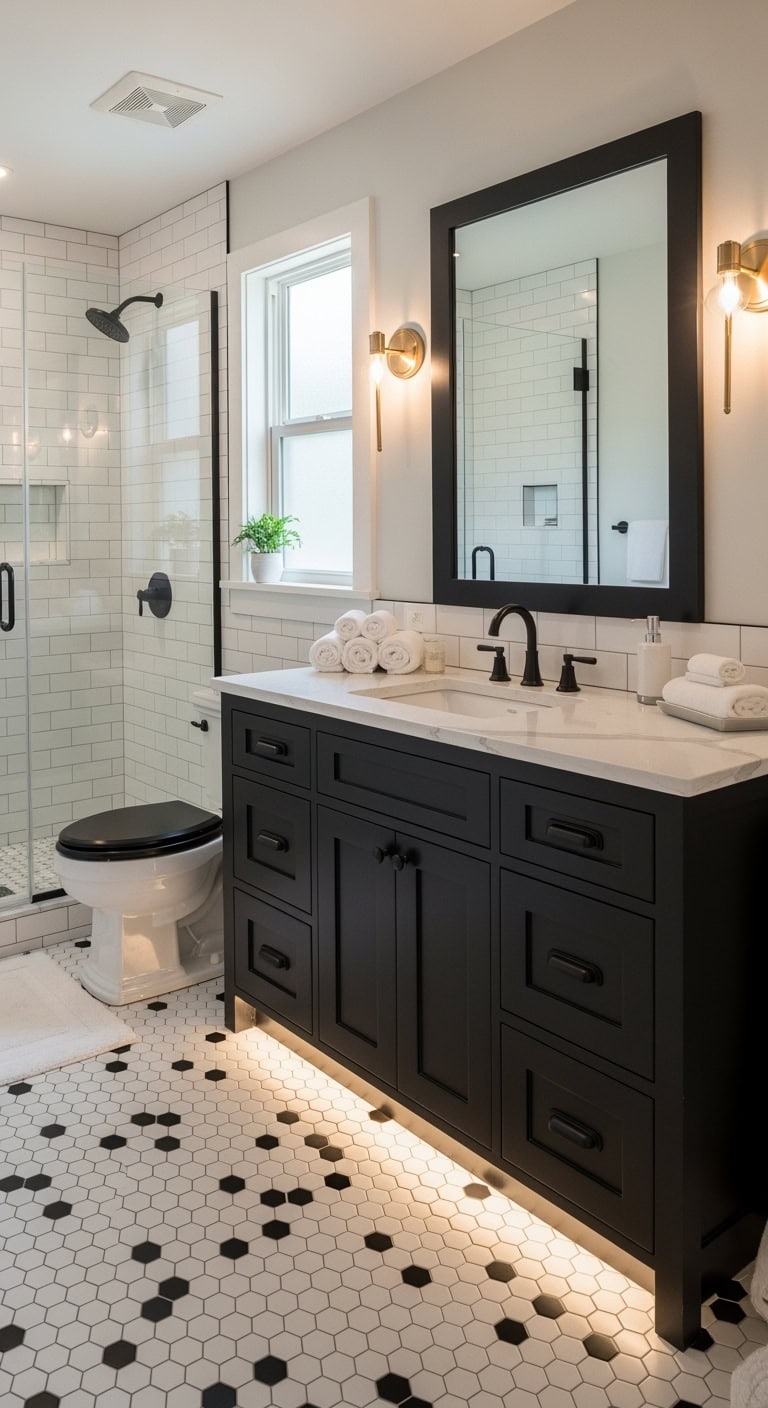
Time to embrace the dark side with a classic black vanity that screams sophistication:
- Matte Magic: Go for matte black hardware – it’s like the little black dress of bathroom fixtures
- Storage Savvy: Pick deep drawers over cabinets for hiding all your beauty chaos
- Counter Contrast: Pair with white marble or quartz for that perfect yin-yang vibe
- Mirror Match: Hang an oversized black-framed mirror to double your style points
- Light It Right: Install sconces at eye level – black vanities eat light for breakfast
Pro Tip: Black vanities are drama queens that need good lighting to avoid the cave effect. Add under-cabinet LED strips for a subtle glow that’ll make your morning routine feel like a spa experience. Your future sleepy self will thank you!
Vintage Octagon Floor Pattern
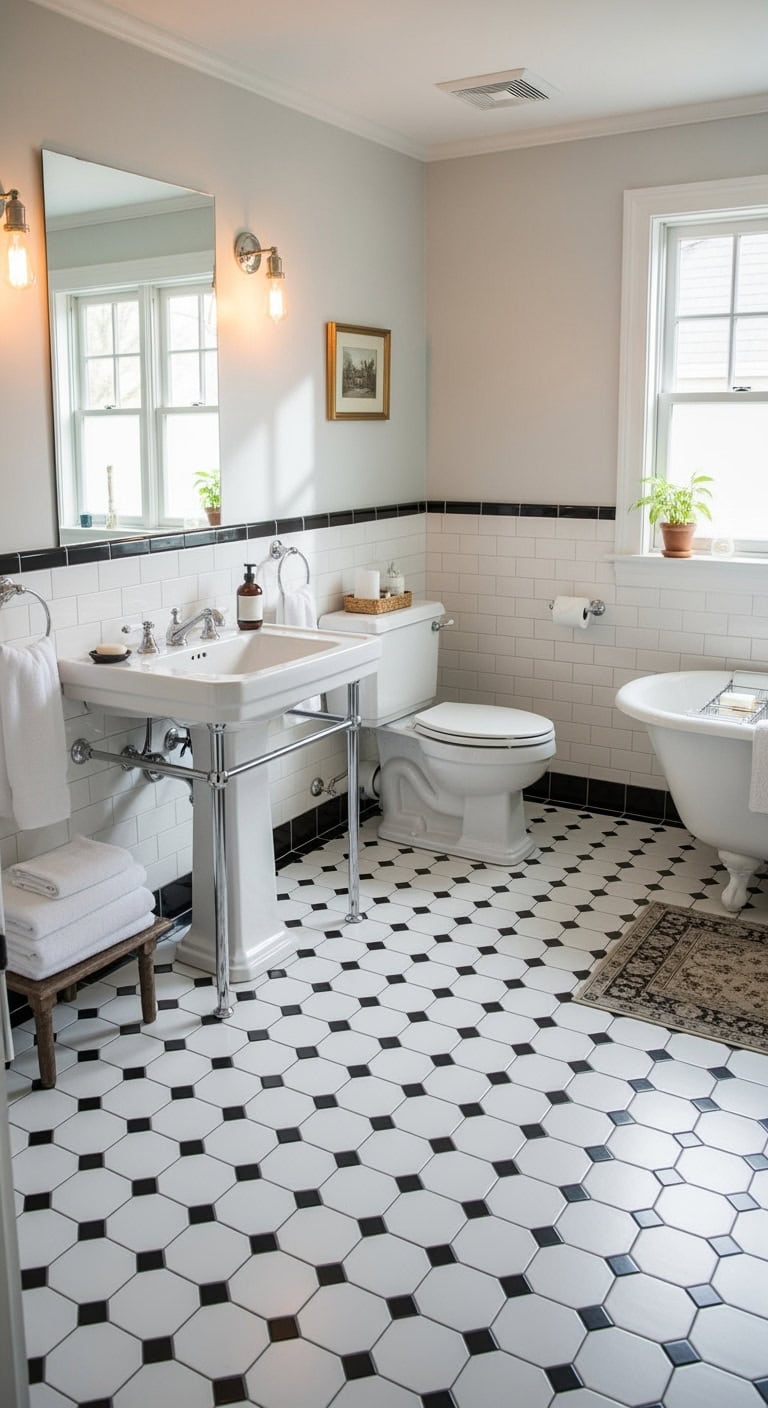
Let’s talk about those vintage octagon floors that’ll make your bathroom feel like a timeless treasure:
- Size Matters: Mix penny-sized octagons with larger squares for visual interest
- Grout Game: Choose dark grout with white tiles (or vice versa) to make the pattern pop
- Entry Statement: Start the pattern at your doorway for maximum wow factor
- Basket Weave Blend: Alternate octagon sheets with basketweave sections for texture play
- Dot Drama: Add black dot inserts between white octagons for authentic vintage vibes
Pro Tip: Octagon floors are attention seekers, so keep walls simple to avoid pattern overload. Stick to subway tiles or painted walls above the chair rail – let your floor be the star of the show while everything else plays supporting roles!
Contrasting Border Floor Design

Border designs are like picture frames for your bathroom floor – they define the space and add instant sophistication:
- Classic Pinstripe: Run a single row of black tiles around the room’s perimeter for subtle definition
- Double Drama: Use two parallel border lines with white space between for hotel-chic vibes
- Corner Accents: Create decorative corner squares where border lines meet for extra polish
- Offset Magic: Set your border 6-12 inches from walls to make small bathrooms feel larger
- Mix Materials: Combine matte field tiles with glossy borders for textural contrast
Pro Tip: Skip borders around fixtures like toilets and vanities – they’ll look awkward and choppy. Instead, let your border flow behind these elements for a cleaner look that makes installation easier and your bathroom feel more spacious!
Glossy Square Grid Pattern
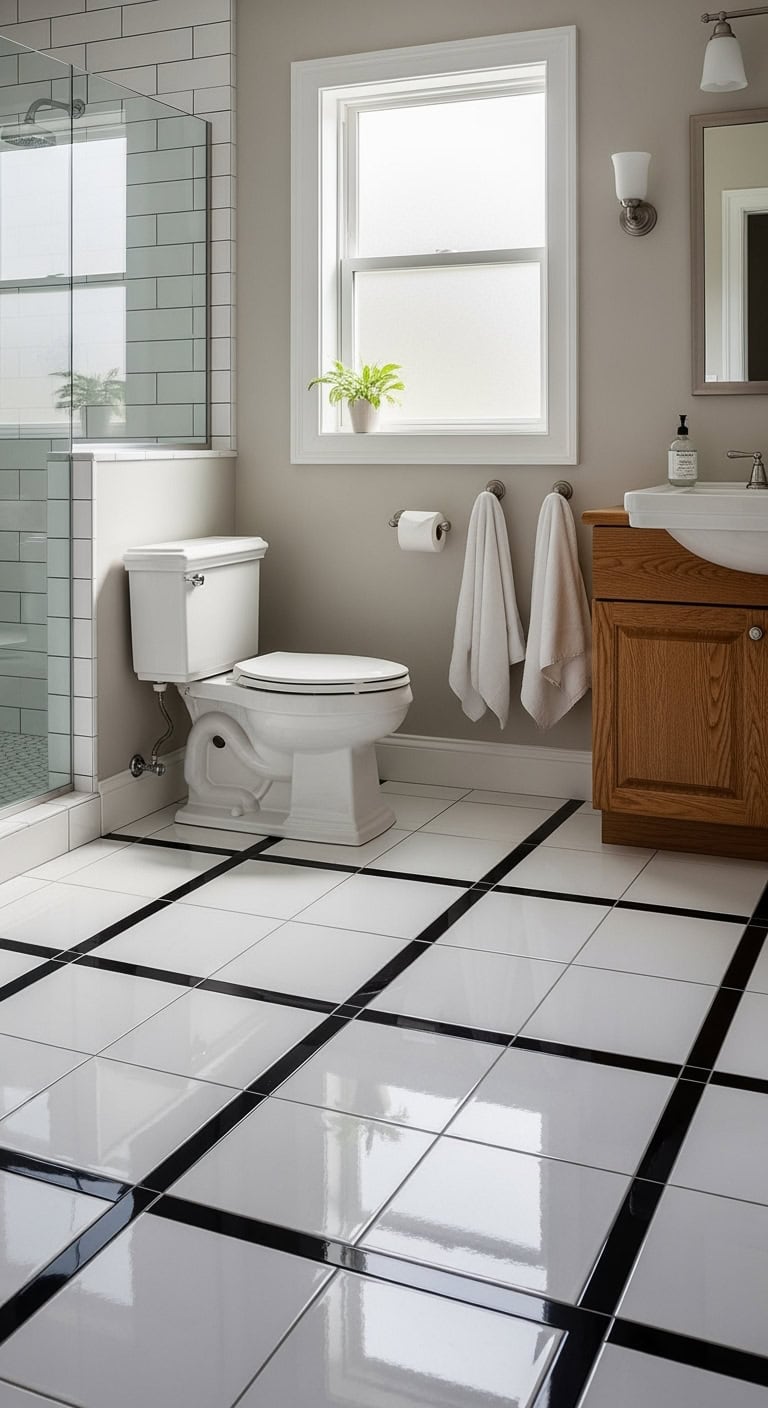
Get ready to fall in love with the timeless appeal of glossy square tiles arranged in a perfect grid pattern! This classic layout brings order and elegance to your bathroom floor:
- Mirror-Like Finish: Glossy tiles reflect light beautifully, making your space feel twice as big
- Perfect Alignment: Grid patterns create satisfying symmetry that’s both modern and traditional
- Size Matters: Go with 12×12 inches for standard bathrooms or 24×24 for luxe, spacious vibes
- Grout Game: Choose contrasting black grout with white tiles (or vice versa) for graphic impact
- Diagonal Twist: Rotate your grid 45 degrees for diamond orientation that adds unexpected energy
Pro Tip: Balance those shiny floors with matte wall tiles to avoid the “disco ball effect” – too much gloss everywhere can feel overwhelming and show every water spot!
Striped Floor Optical Illusion
Who knew your bathroom floor could play tricks on your eyes? Striped patterns are the ultimate optical illusion that’ll make your space feel like it goes on forever:
- Lengthwise Lines: Run stripes from door to opposite wall to visually stretch your bathroom
- Width Warriors: Go horizontal if you need the room to feel wider rather than longer
- Thickness Variety: Mix thin and thick stripes for a modern barcode effect
- Monochrome Magic: Alternate pure black and crisp white tiles for maximum drama
- Border Definition: Frame the entire floor with a solid border to contain the energy
Pro Tip: Keep everything else simple when you’ve got bold floor stripes – plain white walls and minimal accessories let your statement floor steal the show without creating visual chaos!
Retro Floral Accent Tiles
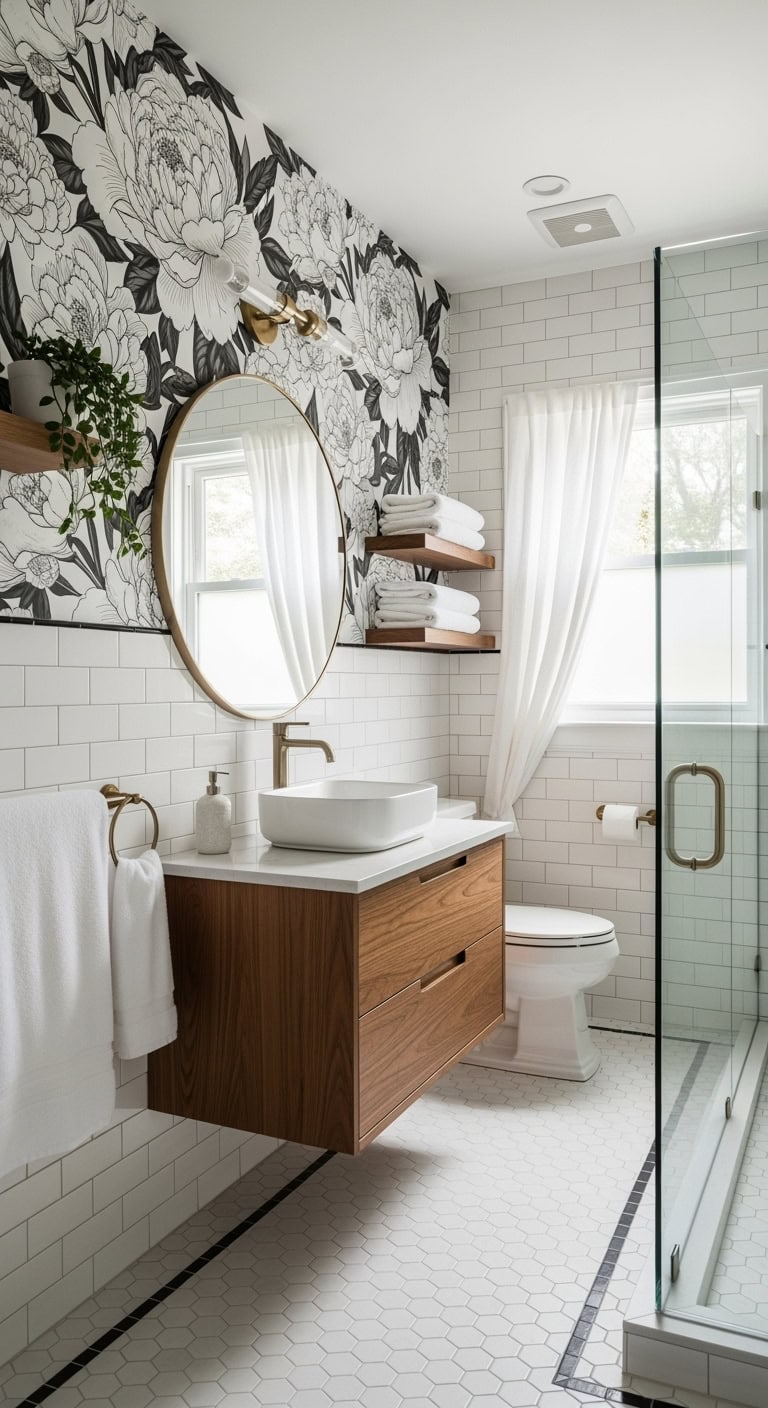
Forget grandma’s bathroom – these black and white florals are giving major vintage-meets-modern vibes! Your space becomes an instant conversation starter with these botanical beauties:
- Feature Wall Focus: Create one stunning accent wall behind your vanity with bold floral tiles
- Scattered Surprises: Mix plain tiles with random floral ones for an artsy, collected-over-time look
- Border Brilliance: Use florals as a decorative border around mirrors or shower niches
- Size Play: Choose oversized blooms for drama or tiny buds for subtle sweetness
- Metallic Touches: Add brass or gold fixtures to warm up the monochrome palette
Pro Tip: Balance busy florals with plenty of solid tiles – think 70% plain to 30% pattern max, so your bathroom feels chic rather than chaotic!
Monochrome Moroccan Zellige Tiles
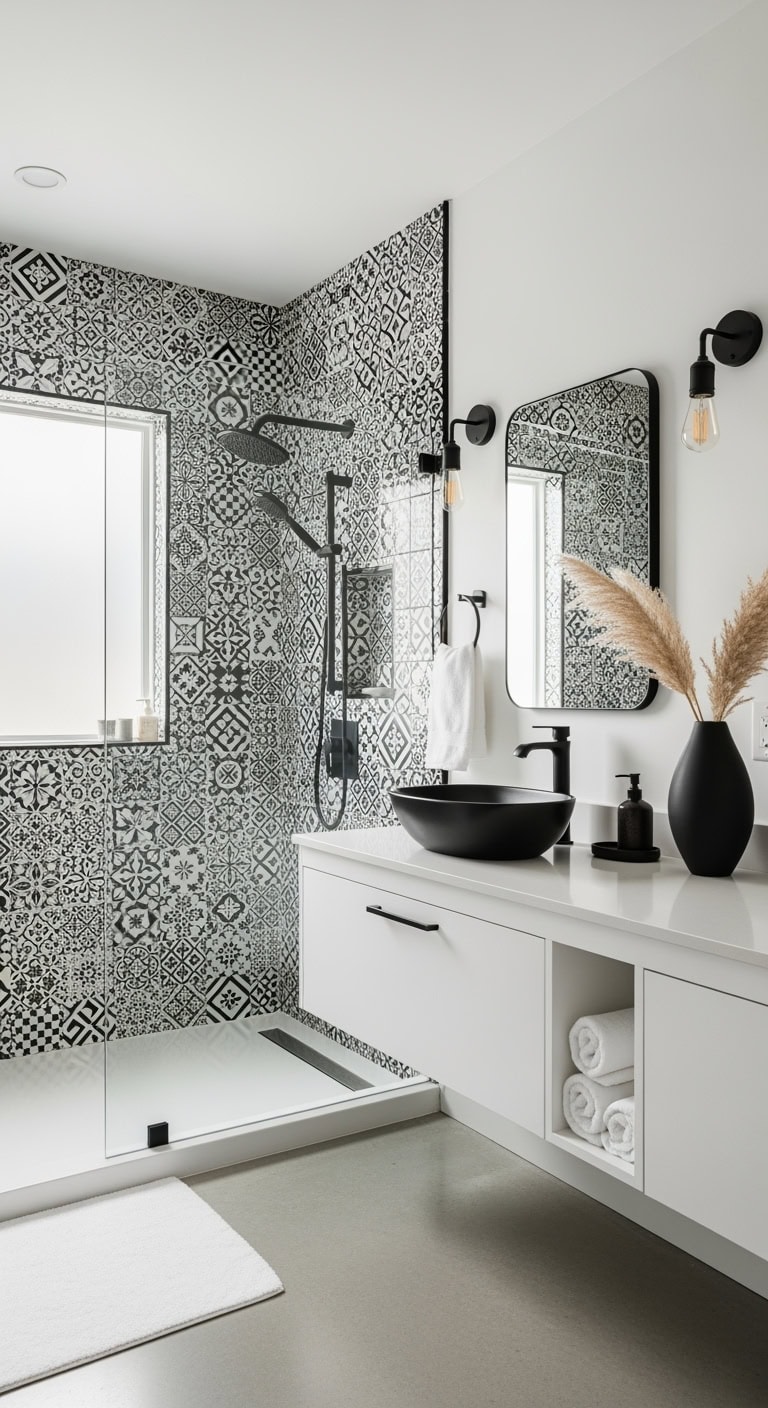
Get ready to channel your inner Marrakech magic with these handcrafted beauties! Monochrome Moroccan zellige tiles transform your bathroom into a chic riad retreat:
- Imperfect Perfection: Embrace the subtle variations in each handmade tile for authentic character
- Full Wall Drama: Cover an entire shower wall for that luxe hammam feeling
- Mix Your Shapes: Combine traditional squares with hexagons or diamonds for modern edge
- Grout Game Strong: Use contrasting black or white grout to highlight the geometric patterns
- Texture Play: The glossy, slightly wavy surface catches light beautifully throughout the day
Pro Tip: Zellige tiles are investment pieces, so use them strategically – a single accent wall or backsplash creates major impact without breaking the bank!
Scandinavian Spa-Inspired Shower Walls
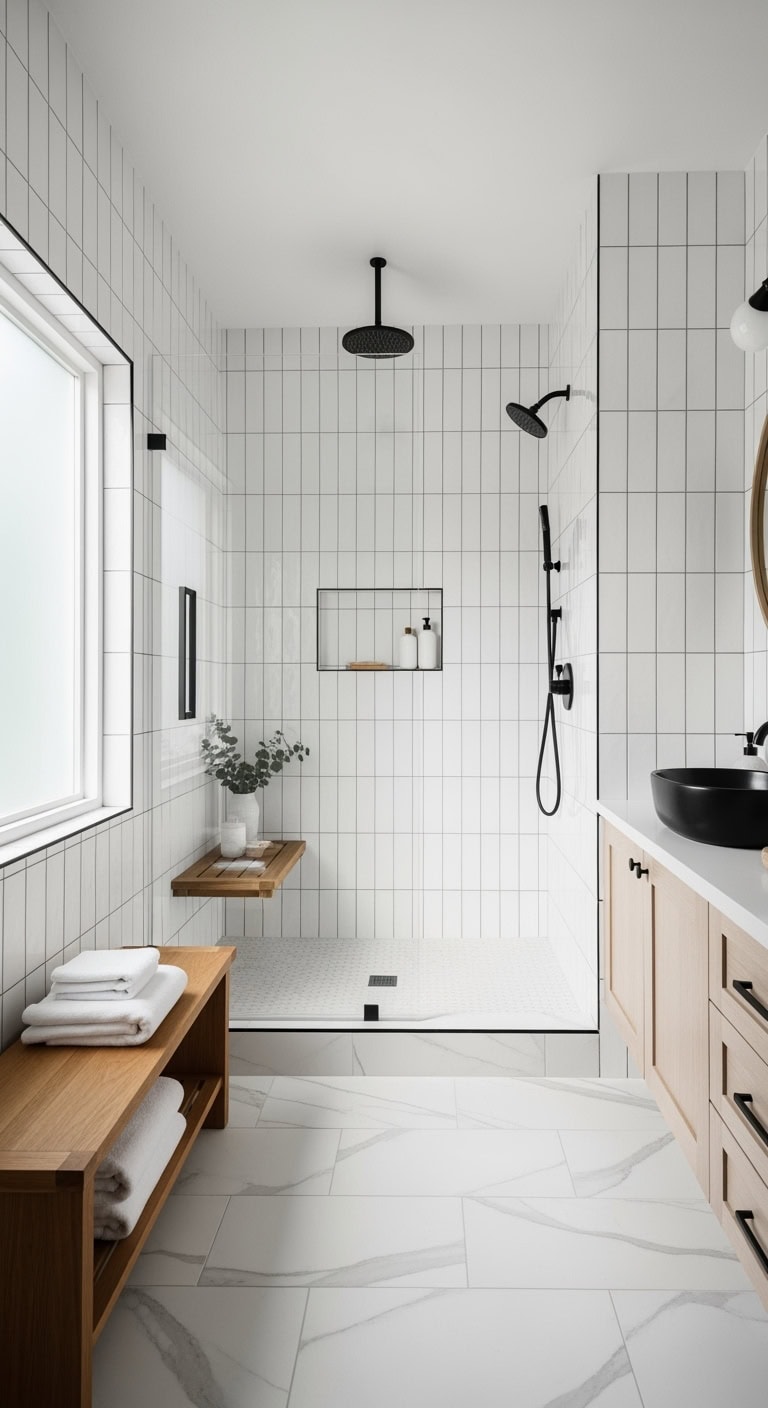
Time to bring that serene Nordic spa vibe home! Transform your shower into a minimalist sanctuary with these crisp black and white elements:
- Matte White Subway Tiles: Stack them vertically for a fresh, modern twist on the classic
- Black Metal Fixtures: Sleek rainfall showerheads and minimal handles add sophisticated contrast
- Thin Black Grout Lines: Creates a subtle grid pattern that’s clean but not sterile
- Natural Wood Accents: Add a teak bench or shelf to warm up the monochrome palette
- Floor-to-Ceiling Coverage: Take tiles all the way up for that luxurious, cocoon-like feel
Pro Tip: Balance the stark contrast by incorporating one soft element – whether it’s a plush white towel, eucalyptus bundle, or natural stone soap dish – to keep your spa space from feeling too cold!
Dramatic Oversized Grid Layout
Ready to make a statement? Go big or go home with an oversized grid pattern that commands attention:
- Large Format Tiles: Think 24×24″ or bigger – fewer grout lines mean maximum drama
- Bold Black Grout: Make those white tiles pop with high-contrast grout that frames each piece
- Mixed Tile Sizes: Combine giant floor tiles with standard wall tiles for visual interest
- Strategic Black Accents: Place single black tiles randomly for an artistic, modern edge
- Geometric Accessories: Echo the grid with square mirrors and angular hardware
Pro Tip: Keep your oversized grid from overwhelming the space by limiting patterns to one wall or the floor only. This creates a focal point without making your bathroom feel like a chess board!
Conclusion
You’ve discovered that black and white tile bathrooms never go out of style. Whether you’re drawn to classic checkerboard floors or contemporary hexagonal designs, these timeless combinations will transform your space into a showstopper that’ll make guests’ jaws drop to the floor. From subway tiles to Moroccan patterns, you’ve got endless options to create your perfect monochrome sanctuary. Now it’s time to pick your favorite design and start creating your dream bathroom.